Scales are the building blocks of all music. Every melody, every song, every concerto you’ll ever play is built from scales. Learn your scales and you learn the DNA of music itself.
In Learn Violin Fast — Book 1, I introduce scales early because they’re that important. Book 2 expands into two-octave scales and new finger patterns. Here’s your complete beginner guide.
 What Is a Scale?
A scale is eight consecutive notes that start and end with the same note.
That’s it. Eight notes. Same starting and ending note. The notes go up in order — no skipping.
Examples:
- D scale: D E F G A B C D
- G scale: G A B C D E F G
- A scale: A B C D E F G A
The first note of a scale is called the tonic — it’s home base. Every scale starts from home and returns to home.
 Why Scales Matter
Here’s a fact that will save you hundreds of hours: if you can play your scales well, you can play almost any piece of music in that key.
Scales contain every note you’ll need. They train your fingers to move in the patterns that songs actually use. When you learn a D major scale, every song in D major becomes easier because your fingers already know where to go.
Think of scales as the alphabet. You need to know your ABCs before you can read words and sentences. Scales are the musical alphabet.
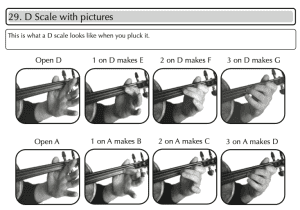
Your First Scale: D Major
The D major scale is the easiest scale on the violin because it uses two open strings and follows the natural tape positions.
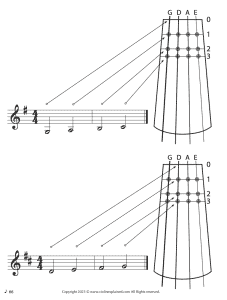
D Major Scale — One Octave
Play on D and A strings:
| Note | String | Finger |
|---|---|---|
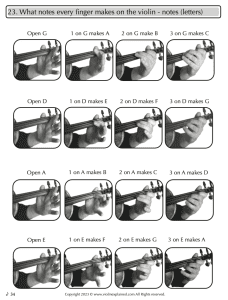
| D | D string | Open (0) |
| E | D string | 1st finger |
| F | D string | 2nd finger |
| G | D string | 3rd finger |
| A | A string | Open (0) |
| B | A string | 1st finger |
| C | A string | 2nd finger |
| D | A string | 3rd finger |
Notice the pattern: Open → 1 → 2 → 3 → Open (next string) → 1 → 2 → 3.
You start on D and end on D — one octave higher.
The G Major Scale
G Major Scale — One Octave
Play on G and D strings:
| Note | String | Finger |
|---|---|---|
| G | G string | Open (0) |
| A | G string | 1st finger |
| B | G string | 2nd finger |
| C | G string | 3rd finger |
| D | D string | Open (0) |
| E | D string | 1st finger |
| F# | D string | 2nd finger |
| G | D string | 3rd finger |
Notice that in G major, the F becomes F# (F sharp). This is because of the key signature — more on that below.
 G Major Scale — Two Octaves
Book 2 teaches the two-octave G major scale, which continues across more strings. The two-octave scale is essential for building finger fluency and navigating the fingerboard.
The A Major Scale
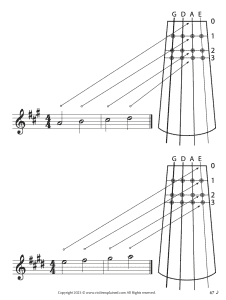
A Major Scale — One Octave
Play on A and E strings:
| Note | String | Finger |
|---|---|---|
| A | A string | Open (0) |
| B | A string | 1st finger |
| C# | A string | 2nd finger |
| D | A string | 3rd finger |
| E | E string | Open (0) |
| F# | E string | 1st finger |
| G# | E string | 2nd finger |
| A | E string | 3rd finger |
A major has three sharps: F#, C#, and G#. Your fingers stay on the tapes for this scale.
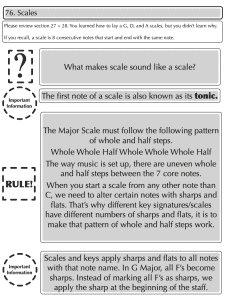
What Makes a Scale Sound Like a Scale?
Every major scale follows the exact same pattern of whole steps and half steps:
Whole – Whole – Half – Whole – Whole – Whole – Half
This pattern is what gives a major scale its characteristic “happy” sound. If you change the pattern, you get a different type of scale (like minor — which sounds “sad”).
Why Do Scales Have Sharps and Flats?
The natural notes (A B C D E F G) have uneven spacing between them. Between most notes there’s a whole step, but between B–C and E–F, there’s only a half step.
When you start a scale on any note other than C, you need to adjust certain notes with sharps or flats to maintain the Whole-Whole-Half-Whole-Whole-Whole-Half pattern.
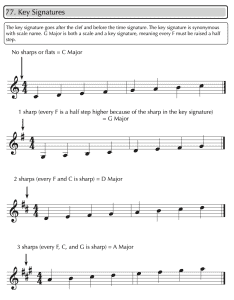
That’s why:
- G major has 1 sharp (F#)
- D major has 2 sharps (F# and C#)
- A major has 3 sharps (F#, C#, and G#)
Key Signatures
A key signature appears at the beginning of every piece of music, right after the clef and before the time signature. It tells you which notes are sharp or flat throughout the entire piece.
Instead of writing a sharp symbol next to every single F in a G major piece, the key signature puts one sharp at the beginning — meaning “every F in this piece is F#.”
Common Violin Key Signatures
| Key | Sharps/Flats |
|---|---|
| C major | No sharps or flats |
| G major | 1 sharp (F#) |
| D major | 2 sharps (F#, C#) |
| A major | 3 sharps (F#, C#, G#) |
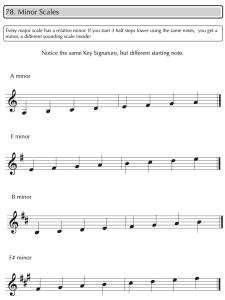 Minor Scales
Every major scale has a relative minor. If you start 3 half steps lower using the same notes, you get a minor scale — a different-sounding scale that uses the same key signature.
For example:
- C major → A minor (A is 3 half steps below C)
- G major → E minor
- D major → B minor
- A major → F# minor
Same notes, same key signature — but a different starting point creates a completely different feel and mood.
Scale Practice Tips
| Tip | Why It Works |
|---|---|
| Start slowly | Accuracy matters more than speed — get every note in tune first |
| Say the note names out loud | Reinforces the connection between finger position and note name |
| Use the Power of 10 | Play each scale 10 times per practice session |
| Play with a metronome | Builds rhythmic consistency |
| Practice going up AND down | Coming down is a different skill — don’t skip it |
| Listen for the ring | When notes are in tune, open strings will vibrate (forced vibration) |
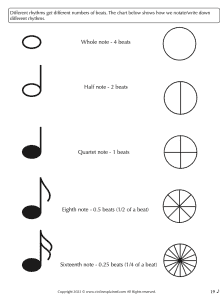
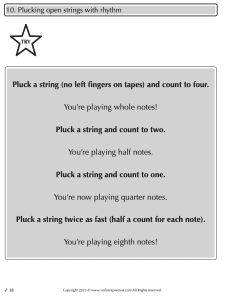
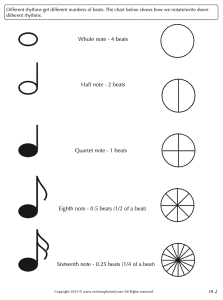
| Try different rhythms | Play scales with whole notes, half notes, quarter notes, eighth notes |
Scale Practice Challenge
- D major — one octave, up and down, 10 times
- G major — one octave, up and down, 10 times
- A major — one octave, up and down, 10 times
- From memory — write down the notes of each scale without looking
- Eyes closed — try plucking the D scale with your eyes closed (it’s harder than you think!)
As a challenge, try plucking scales while walking around the room (with your eyes open, please!).
Get the Full Method
This guide covers scale basics, but Learn Violin Fast — Book 1 includes the complete scale system with diagrams, fingering charts, and exercises. Book 2 expands into two-octave scales, G major with Low 2’s, and pieces that put your scales to work.
👉 Get Learn Violin Fast — Book 1 on Amazon — the complete beginner method with step-by-step diagrams, scales, exercises, and 8 songs.
🎬 Subscribe to Violin Explained on YouTube for video demonstrations of violin scales.
Written by Sergei Panov, author of the Learn Violin Fast method book series and founder of ViolinExplained.com. Sergei has taught over 1,000 violin students and developed this method to help beginners learn as quickly and enjoyably as possible.
 How Often Should You Rosin Your Bow?
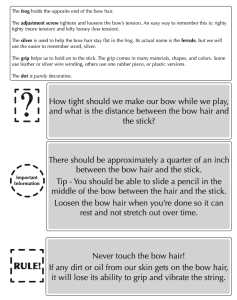 Always Loosen the Bow When You’re Done
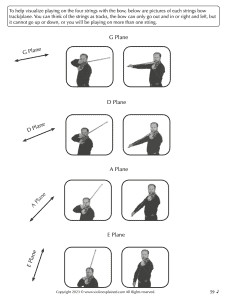
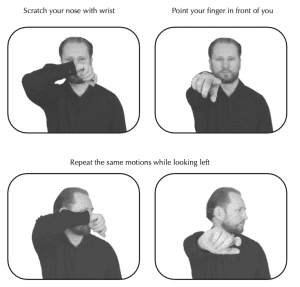 That’s the direction and motion of the bow. First, practice this motion without the violin. Next, try it with the bow in your hand. Finally, apply it on the strings.
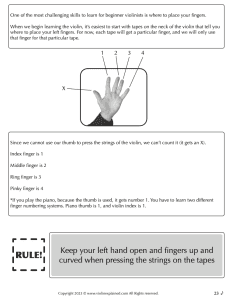
 The Pattern:
 Shoulder Awareness:
 Try this right now:

 Visual Spacing Trick
 Common Mistakes When Reading Sheet Music
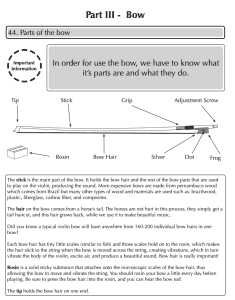
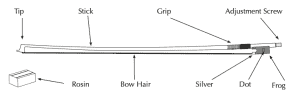 Parts of the Violin Bow:
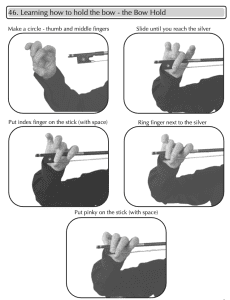 Step 1: Make a Circle with Your Thumb and Middle Finger