The bow hold is the most important technique in violin playing — it controls your tone, volume, and expression. A bad bow hold leads to scratchy sound, tension, and frustration.
In Learn Violin Fast — Book 1, I break the bow hold down into simple steps that any beginner can follow. But before we pick up the bow, you need to know what you’re holding.
How Do You Hold a Violin Bow?
Place your thumb and middle finger in a circle on the bow’s frog, then add your index finger on the stick, ring finger next to the silver (ferrule), and pinky on top of the stick — all with curved, relaxed fingers.
That’s the short version. Let me walk you through every detail.
First: Know Your Bow Parts
Before learning the bow hold, you need to understand the parts of the bow and what they do. In my experience, students who understand why each part matters learn the bow hold faster.
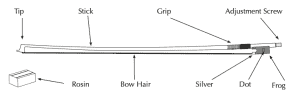 Parts of the Violin Bow:
- Stick — The main part of the bow. Holds the hair and all other parts. Made from pernambuco wood (expensive), brazilwood, carbon fiber, fiberglass, or composites
- Hair — Comes from a horse’s tail (the horses are not hurt — they simply get a tail haircut!). A typical bow has 160–200 individual hairs
- Rosin — A solid sticky substance that coats the bow hair, allowing it to grip and vibrate the string to produce sound
- Tip — Holds the bow hair on one end
- Frog — Holds the bow hair on the opposite end (this is where your hand goes)
- Adjustment screw — Tightens and loosens bow tension. Remember: righty tighty, lefty loosey
- Silver (ferrule) — Keeps the bow hair flat in the frog. Its real name is the ferrule, but “silver” is easier to remember
- Grip — Helps you hold the stick. Comes in leather, rubber, plastic, or silver wire winding
- Dot — Purely decorative
How Bow Hair Makes Sound
Each bow hair has tiny scales — similar to fish scales — that hold onto the rosin. When the bow moves across the string, the rosin makes the hair stick to the string, creating vibrations. Those vibrations travel through the bridge into the body of the violin, excite the air inside, and produce a beautiful sound.
This is why you should never touch the bow hair with your fingers. Oil from your skin will coat the scales and the bow will lose its ability to grip the string.
How Tight Should the Bow Be?
There should be approximately a quarter of an inch between the bow hair and the stick when tightened for playing.
Quick test: You should be able to slide a pencil between the hair and the stick in the middle of the bow.
Important: Always loosen the bow hair when you’re done playing so it can rest and not stretch out over time.
How to Hold a Violin Bow: 6 Steps
Here is the exact method I teach in Learn Violin Fast — Book 1:
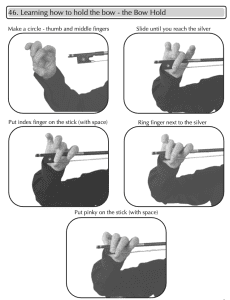 Step 1: Make a Circle with Your Thumb and Middle Finger
Touch the tips of your thumb and middle finger together to form a round “O” shape. This is the foundation of your entire bow hold. Keep it relaxed — don’t squeeze.
Step 2: Slide Until You Reach the Silver
Place this circle onto the bow at the frog and slide your fingers until your thumb reaches the silver (ferrule). Your thumb should be bent, not locked straight.
Step 3: Place Your Index Finger on the Stick
Rest your index finger on the stick, with a small space between it and the middle finger. The stick should contact your index finger between the first and second knuckle.
Step 4: Place Your Ring Finger Next to the Silver
Your ring finger goes right next to the silver, close to your middle finger. It provides support and balance.
Step 5: Place Your Pinky on Top of the Stick
Your pinky goes on top of the stick, curved and resting on its tip. This is the most important finger in the bow hold — it acts as a counterbalance, especially when playing at the tip of the bow.
Step 6: Check Your Hold
All fingers should be:
- Curved (not flat or locked)
- Relaxed (not squeezing)
- Spaced (not bunched together)
Your thumb should be bent and opposite your middle finger.
The Pinky Trick That Fixes 90% of Bow Hold Problems
Here’s the secret most teachers don’t emphasize enough: your pinky is the key to the entire bow hold.
When beginners play, the bow feels heavy at the tip. The natural reaction is to squeeze harder with the thumb and index finger. However, this creates tension, a scratchy sound, and eventually pain.
The fix? Keep your pinky curved and on top of the stick. It acts as a counterweight. When your pinky is doing its job, your other fingers can stay relaxed.
If your pinky keeps collapsing flat or falling off the bow, practice this:
- Hold the bow vertically (tip pointing up)
- Balance it using only your thumb and pinky
- Practice tapping your other fingers on and off the stick
As a result, this builds pinky strength and awareness.
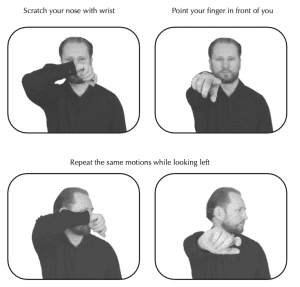
Bow Motion: The “Scratch-You” Technique
Once you have a solid bow hold, you need to learn the motion of bowing. In Learn Violin Fast, I teach a simple way to remember the bow motion:
- Scratch your nose with your wrist — that inward motion
- Point your finger in front of you — that outward motion
That’s the direction of the bow: in and out, like scratching and pointing.
Think: “Scratch — You”
First, practice these motions without the violin. Next, try them while holding the bow. Finally, apply them on the strings.
Playing Your First Bow Strokes
Now let’s put it all together. With the violin on your shoulder and the bow in your hand:
- Place the bow on the string — halfway between the bridge and the fingerboard (this is called the highway or sounding point)
- Keep the bow at 90 degrees to the string
- Don’t press hard — for now, just move the bow in and out gently
- Play full bows — from frog to tip and back on all four strings
Key Tips for Your First Bow Strokes:
- Bow placement matters: Stay on the highway (halfway between bridge and fingerboard)
- 90 degrees: The bow should be perpendicular to the strings
- Light pressure: Let the weight of the bow do the work
- Relax your shoulders: Tell your shoulders to “chill” and keep them down
- Think in tracks: Each string has its own plane — the bow goes right and left, not up and down
Common Bow Hold Mistakes
| Mistake | Fix |
|---|---|
| Flat pinky (collapsed) | Curve it and place on tip — practice the vertical balance exercise |
| Locked/straight thumb | Bend your thumb — it should be flexible |
| Squeezing too hard | Relax — if your hand hurts, you’re gripping too tight |
| Index finger too close to middle | Keep space between all fingers |
| Bow bouncing on the string | Slow down, use less pressure, stay on the highway |
| Bow sliding toward the fingerboard | Watch your contact point — keep it halfway to the bridge |
Rosin: Don’t Forget This Step
Before you play, you need to rosin your bow every day. Rosin is what allows the bow hair to grip the string.
- Press the bow hair into the rosin and slide back and forth
- You can actually hear the bow “eat” the rosin — a slight grabbing sound
- A few passes is enough — you don’t need a lot
- New bows need extra rosin the first time (10–15 passes)
Practice Checklist
Use the Power of 10 — do each task 10 times to build muscle memory:
- Practice making the bow hold circle (thumb + middle finger)
- Form the complete bow hold with all 5 fingers
- Vertical bow balance exercise (thumb + pinky only)
- “Scratch-You” motion without the bow
- “Scratch-You” motion with the bow
- Full bow strokes on each open string (G, D, A, E)
- Check: Is your pinky curved? Thumb bent? Shoulders relaxed?
Get the Full Method
This guide covers the bow hold basics, but Learn Violin Fast — Book 1 includes detailed photos, the complete bow parts quiz, bowing exercises on all four strings, and 8 songs to play with the bow.
👉 Get Learn Violin Fast — Book 1 on Amazon — the complete beginner method with step-by-step diagrams, exercises, and songs.
🎬 Subscribe to Violin Explained on YouTube for video demonstrations of the bow hold and bowing technique.
Written by Sergei Panov, author of the Learn Violin Fast method book series and founder of ViolinExplained.com. Sergei has taught over 1,000 violin students and developed this method to help beginners learn as quickly and enjoyably as possible.