A scratchy, squeaky violin is the #1 frustration for beginners — but the fix is almost always simple. In most cases, it comes down to where your bow is, how much pressure you’re using, and the angle of the bow.
In Learn Violin Fast — Book 1, I teach students exactly how to produce a clean, beautiful sound from their very first bow strokes. Here are the 5 most common causes of bad tone and how to fix each one.
Why Does My Violin Sound Scratchy?
A scratchy violin sound is almost always caused by incorrect bow placement, wrong angle, too much bow pressure, or bow moving too slowly — all of which are easy to fix once you know what to look for.
Let’s go through each fix one by one.
Fix #1: Check Your Bow Placement (The Highway)
This is the most common cause of scratchy sound. Where the bow contacts the string matters enormously.
The Rule:
The bow should travel halfway between the bridge and the fingerboard. In Learn Violin Fast, we call this the highway or sounding point.
- Too close to the bridge → harsh, crunchy, scratchy sound
- Too close to the fingerboard → weak, airy, unfocused sound
- On the highway → clean, resonant, beautiful tone
How to find the highway:
- Look at your violin from the side
- Find the bridge (the wooden piece holding the strings up)
- Find the end of the fingerboard (the black board under the strings)
- The midpoint between them is your highway
Keep your eyes on the bow’s contact point while you play. Most beginners let the bow drift toward the fingerboard without realizing it.
Fix #2: Reduce Bow Pressure
Beginners almost always press too hard with the bow. It feels natural to push down harder to make a louder sound — however, on the violin, more pressure = worse sound.
The Rule:
Don’t press hard with the bow. For now, just move the bow in and out.
The weight of the bow itself is enough to produce sound. Your job is to guide the bow smoothly across the string, not to crush it.
How to practice light pressure:
- Place the bow on the string
- Let it rest with just its own weight — don’t add any arm pressure
- Slowly draw the bow from frog to tip
- Listen — this light, natural weight produces the cleanest tone
As you advance, you’ll learn to add controlled weight for dynamics. But for now, lighter is better.
Fix #3: Keep the Bow at 90 Degrees
The bow must travel perpendicular (90°) to the string. If the bow is angled, it slides across the string unevenly, creating scratches and squeaks.
How to check:
- Look down at your bow while playing
- The bow should form a right angle with the string
- The bow should move in a straight line, parallel to the bridge
Common causes of a crooked bow:
- Elbow too high or too low
- Wrist too stiff
- Not using full arm motion (shoulder to wrist)
Fix #4: Bow is Moving Too Slowly
If your bow moves too slow a speed, it will make the string crunch.
What bow speed does:
If the bow is moving too slowly, it will always create a scratchy sound. The reason for this is usually playing with too much right-hand and arm tension. To make the violin sound beautiful, relax your right hand and move the bow faster. Using less force will allow your bow to move and create a beautiful sound.
Important:
Never touch the bow hair with your fingers! Oil from your skin will coat the scales and the bow will lose its ability to grip the string. If this happens, the bow will need to be rehaired.
Fix #5: Stay on One String (String Planes)
If you hear two strings sounding at once (a crunchy, dissonant sound), your bow is crossing between string planes.
What are string planes?
Each string has its own plane or track. Think of the strings as lanes on a highway — the bow can only go right and left (in and out), not up and down. If you move the bow up or down, you’ll accidentally play two strings at once.
The four planes from highest bow arm to lowest:
- G Plane — bow arm highest
- D Plane — slightly lower
- A Plane — lower still
- E Plane — bow arm lowest
How to practice:
- Place the bow on one string
- Check that only that one string is being touched
- Draw a full bow slowly — frog to tip
- Watch the bow the entire time to make sure it stays on one string
- Repeat on each string
Bonus Fix: Relax Your Shoulders
This isn’t directly about sound — but it affects everything.
When we do difficult tasks, our shoulders tend to tense up. A raised, tense shoulder:
- Restricts your bow arm movement
- Adds unwanted pressure to the bow
- Creates a stiff, scratchy tone
- Causes pain and fatigue
The fix: While you play, consciously tell your shoulders to relax and stay down. Check in with your shoulders every 30 seconds until it becomes a habit.
As I tell my students: “Tell your shoulders to chill.”
The “Scratch-You” Technique for Smooth Bowing
Here’s a simple way to remember the correct bow motion from Learn Violin Fast:
- Scratch your nose with your wrist — that inward pulling motion
- Point your finger in front of you — that outward pushing motion
Think: “Scratch — You”
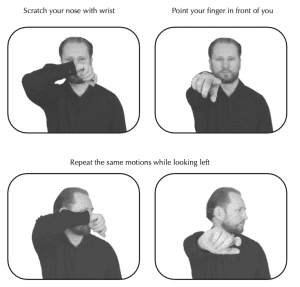 That’s the direction and motion of the bow. First, practice this motion without the violin. Next, try it with the bow in your hand. Finally, apply it on the strings.
Quick Diagnostic Chart
| Problem | Most Likely Cause | Fix |
|---|---|---|
| Scratchy, crunchy sound | Bow too close to bridge | Move bow to the highway (midpoint) |
| Weak, airy, unfocused sound | Bow too close to fingerboard | Move bow toward the bridge |
| Squeaky, high-pitched squeal | Too much pressure | Lighten up — let bow weight do the work |
| No sound at all / bow sliding | Not enough rosin | Rosin your bow (a few passes) |
| Two strings sounding at once | Bow crossing string planes | Stay on one plane, watch your bow |
| Inconsistent tone | Bow not at 90° to string | Straighten your bow path |
| Everything sounds tense | Shoulder tension | Relax shoulders, keep them down |
Practice Checklist
Use the Power of 10 — do each exercise 10 times:
- Bow one open string with zero added pressure (just bow weight)
- Find the highway on each string and bow slowly
- Check bow angle — is it 90° to the string?
- Bow full bows (frog to tip) on each string, staying on one plane
- Practice “Scratch-You” motion with the bow
- Check shoulders — are they relaxed and down?
- Rosin your bow before every practice session
Get the Full Method
This guide covers the main tone fixes, but Learn Violin Fast — Book 1 walks you through the complete bowing technique with detailed photos, the bow parts and their functions, bow hold steps, and exercises on all four strings.
👉 Get Learn Violin Fast — Book 1 on Amazon — the complete beginner method with step-by-step diagrams, exercises, and songs.
🎬 Subscribe to Violin Explained on YouTube for before-and-after demonstrations of these tone fixes.
Written by Sergei Panov, author of the Learn Violin Fast method book series and founder of ViolinExplained.com. Sergei has taught over 1,000 violin students and developed this method to help beginners learn as quickly and enjoyably as possible.