The four open strings are the very first sounds you’ll make on the violin — and mastering them is the foundation for everything that comes after.
In Learn Violin Fast — Book 1, open strings are where every student begins. Before you learn finger placement, before you pick up the bow, before you read sheet music — you learn G, D, A, and E.
What Are the Open Strings on a Violin?
The four open strings on a violin are G, D, A, and E — played from lowest to highest pitch without pressing any fingers on the fingerboard.
An “open” string simply means you play the string without any left-hand fingers pressing down. As a result, the string vibrates at its full length, producing its natural pitch.
The Four Strings: G, D, A, E
| String | Pitch | Sound | Thickness |
|---|---|---|---|
| G | Lowest | Deep, warm, rich | Thickest |
| D | Second lowest | Warm, mellow | Medium-thick |
| A | Second highest | Bright, clear | Medium-thin |
| E | Highest | Brilliant, bright | Thinnest |
How to Remember the String Order
The strings from lowest to highest are G – D – A – E. Here are some memory tricks:
- Good Dogs Always Eat
- Go Down And Eat
- Girls Don’t Always Exercise
Or simply remember: the strings are not in alphabetical order. They go G, D, A, E — with the lowest, thickest string on the left (when holding the violin) and the highest, thinnest string on the right.
How Does Each String Work?
Each string is different in sound, tension, and thickness:
- The G string is low because it’s thicker — more mass means slower vibrations
- The E string is high because it’s thinner — less mass means faster vibrations
You can change the sound of any string in two ways:
- Change its tension — by turning the peg or fine tuner (this is tuning)
- Change its length — by pressing your left finger on the string (this is how you play different notes)
When you press a finger down, you make the vibrating part of the string shorter, which creates a higher pitch. This is the fundamental principle behind every note you’ll ever play on the violin.
How to Pluck Open Strings
Plucking (called pizzicato or pizz.) is the easiest way to make your first sounds. In the Learn Violin Fast method, we start with plucking guitar-style before moving to the shoulder and bow.
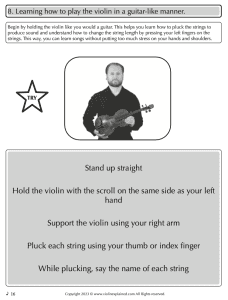
Guitar Style (Day 1):
- Hold the violin like a guitar
- Support it with your right arm
- Pluck each string with your thumb or index finger
- Say the name of each string as you pluck it: “G… D… A… E…”
On the Shoulder (After You’ve Learned Shoulder Position):
- Hold the violin on your shoulder
- Pluck the strings with your right index finger
- Pluck away from the bridge — this is the rule for pizzicato
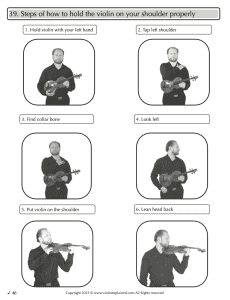
RULE: We pluck (pizz.) the string away from the bridge. We bow (arco) near the bridge.
Plucking Open Strings with Rhythm
Once you can pluck each string, add rhythm. This is how you start making music — not just sounds.
Try this exercise from Learn Violin Fast — Book 1:
| Exercise | What You’re Playing | How |
|---|---|---|
| Pluck a string, count to 4 | Whole notes | One pluck, hold for 4 beats |
| Pluck a string, count to 2 | Half notes | One pluck, hold for 2 beats |
| Pluck a string, count to 1 | Quarter notes | One pluck per beat |
| Pluck twice per beat | Eighth notes | Two quick plucks per beat |
Practice this on every string. Start with G, then D, then A, then E.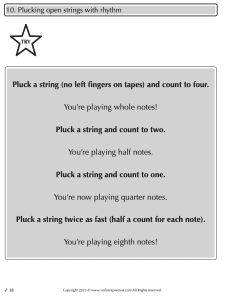
How to Bow Open Strings
After you’ve learned the bow hold and shoulder position (covered in Parts II and III of the book), you’ll play open strings with the bow. This is where the violin really starts to sing.
Key Rules for Bowing Open Strings:
- Bow placement: Halfway between the bridge and the fingerboard — this is called the highway or sounding point
- Bow angle: Keep the bow at 90 degrees to the string
- Pressure: Don’t press hard — let the weight of the bow do the work
- Full bows: Play from frog to tip and back
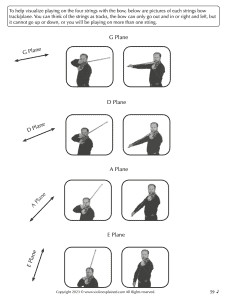
String Planes
Each string has its own plane or track. Think of the strings as railroad tracks — the bow can only go right and left (in and out), not up and down. If you move the bow up or down, you’ll accidentally play two strings at once.
- G Plane — bow arm is highest
- D Plane — bow arm slightly lower
- A Plane — bow arm lower still
- E Plane — bow arm is lowest
Open Strings on the Staff
When you start reading sheet music, here’s where the open strings appear on the treble clef staff:
- G — below the staff on a ledger line (two ledger lines below)
- D — just below the staff (one ledger line below)
- A — in the second space of the staff
- E — in the fourth space of the staff
The pattern is simple: low strings = low on the staff, high strings = high on the staff.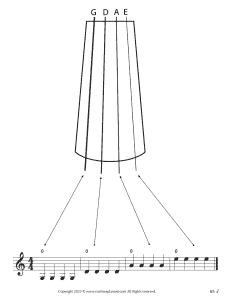
Why Open Strings Matter So Much
Open strings aren’t just a beginner exercise — they’re the foundation of everything:
- Tuning: You tune by listening to open strings
- Scales: Every scale starts or passes through an open string
- Songs: Many melodies use open strings as anchor notes
- Tone production: Open strings are the easiest way to practice good bow technique
- Double stops: Advanced players use open strings alongside fingered notes
Even professional violinists warm up with open strings every day. Therefore, mastering them now sets you up for success at every level.
Practice Exercises
Use the Power of 10 — do each exercise 10 times:
- Pluck each open string guitar-style and say its name (G, D, A, E)
- Pluck each string going up (G→D→A→E) and back down (E→A→D→G)
- Pluck whole notes on each string (count to 4)
- Pluck quarter notes on each string (count to 1)
- Pluck open strings on the shoulder
- Bow each open string with full bows (frog to tip)
- Bow open strings going up and down all four strings
- Name the open strings from memory without looking
Get the Full Method
Open strings are just the beginning. Learn Violin Fast — Book 1 takes you from your first pluck through finger placement, reading music, scales, and 8 complete songs.
👉 Get Learn Violin Fast — Book 1 on Amazon — the complete beginner method with step-by-step diagrams, exercises, and songs.
🎬 Subscribe to Violin Explained on YouTube for video demonstrations of open string exercises and bowing technique.
Written by Sergei Panov, author of the Learn Violin Fast method book series and founder of ViolinExplained.com. Sergei has taught over 1,000 violin students and developed this method to help beginners learn as quickly and enjoyably as possible.