Holding a violin correctly is the single most important skill you’ll learn as a beginner — get it right from Day 1 and everything else becomes easier.
Having taught over 500 students, I can tell you that most beginners struggle not because they lack talent, but because they try to play on the shoulder before their body is ready. In my method book Learn Violin Fast — Book 1, I teach a two-stage approach that makes holding the violin feel natural from the very first lesson.
How Do You Hold a Violin for the First Time?
Hold the violin like a guitar first to learn the basics without strain, then transition to the shoulder position once your hands are comfortable with the strings and notes.
This two-stage approach — guitar style first, shoulder style second — is the foundation of the Learn Violin Fast method. It lets you start making music immediately while your body builds the strength and muscle memory needed for the traditional shoulder position.
Stage 1: Guitar Style (Your First Days)
Before putting the violin on your shoulder, start by holding it like a guitar. This is how I begin every new student’s journey in Learn Violin Fast — Book 1.
Why Start Guitar Style?
- You can learn to pluck the strings and produce sound right away
- You understand how finger placement changes pitch without the stress of balancing the instrument
- Your hands and shoulders aren’t under strain, so you can focus on learning notes and songs
- You can learn your first songs within minutes (Hot Cross Buns, Twinkle Twinkle)
How to Hold the Violin Guitar Style:
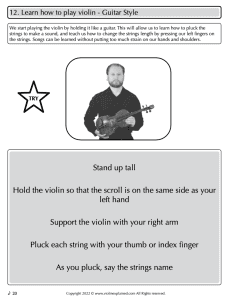
- Stand up straight — good posture starts here
- Hold the violin with the scroll on the same side as your left hand — the neck points to your left
- Support the violin using your right arm — cradle the body against you
- Pluck each string using your thumb or index finger — say the name of each string as you pluck (G, D, A, E)
This position lets you learn all the basics — open strings, finger placement, reading music, and even your first songs — before you ever put the violin on your shoulder.
Stage 2: Holding the Violin on Your Shoulder
Once you’re comfortable with the notes and can pluck simple songs, it’s time to transition to the shoulder position. This is where most beginners get frustrated — but it doesn’t have to be hard if you understand why it feels awkward.
Why Is the Shoulder Position So Difficult?
Think about what your body does all day. Your hands are typically by your sides or in front of you — below your waist. When you read, write, or type, your hands are always in front of you.
Playing the violin requires your hands to move in totally different motions and be in positions you’re simply not used to. That’s why it feels uncomfortable at first — it’s not you, it’s biology.
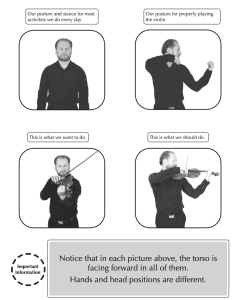
The Proper Violin Position:
- The violin should be on your left shoulder
- The bottom center of the violin rests on your left collar bone
- The bow in the right hand is in front of your body with the hand straight
- The left hand holds the violin over to the left side
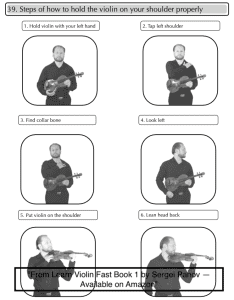
How to Hold a Violin on Your Shoulder: 6 Steps
Here is the exact step-by-step method I teach in Learn Violin Fast:
- Hold the violin with your left hand
- Tap your left shoulder — find where the violin will sit
- Find your collar bone — this is the anchor point
- Look left — turn your head to the left
- Put the violin on the shoulder — rest it on the collar bone
- Lean your head back — let the chin rest support the weight
Pro tip: Your left shoulder will want to squeeze up. Train your shoulder to relax and keep it down. This is the #1 mistake I see beginners make — a tense, raised shoulder leads to pain and bad habits.
Do You Need a Shoulder Rest or Sponge?
To help support the violin on your shoulder, you’ll use either a sponge or a shoulder rest.
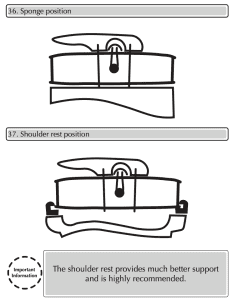
Sponge Method:
- Attach two small rubber bands (or one large one) to the violin’s end button and corners of the C bout
- Place the sponge between the violin and your shoulder
Shoulder Rest Method:
- Simply clip the shoulder rest onto the bottom of the violin
- The shoulder rest provides much better support and is highly recommended
Left Hand Placement
With the violin on your shoulder, your left hand supports the neck of the violin:
- Your knuckle and top of the thumb support the violin neck
- Keep a space at the bottom of your hand between the index finger and knuckle
- Your left wrist should be at 180 degrees between the elbow and hand — a straight line
- Do not bend your wrist in or out, and don’t let it touch the neck of the violin
This is what we call keeping your left hand “open.”
Common Mistakes When Holding a Violin
Based on my experience teaching hundreds of students, here are the most common mistakes:
| Mistake | Fix |
|---|---|
| Raised left shoulder (tension) | Consciously relax and drop your shoulder down |
| Violin sliding off shoulder | Use a shoulder rest (not just a sponge) |
| Wrist bent inward touching the neck | Keep wrist straight — 180° from elbow to hand |
| Holding violin in front of body | Move it to the left, over your left shoulder |
| Gripping too hard with chin | Rest your jaw lightly on the chin rest — don’t clamp |
| Trying shoulder position too soon | Start guitar style first, build comfort with notes |
Practice Checklist
Use the Power of 10 — do each task 10 times to build muscle memory:
- Hold violin guitar style and pluck each open string (G, D, A, E)
- Attach shoulder rest and place violin on shoulder
- Follow the 6 steps to proper shoulder position
- Check left hand placement (open wrist, thumb position)
- Pluck open strings on the shoulder
- Play Hot Cross Buns guitar style, then on the shoulder
Get the Full Method
This guide covers the basics, but there’s so much more in the book — finger placement charts, note-by-note exercises, and 8 songs to learn in Book 1 alone.
👉 Get Learn Violin Fast — Book 1 on Amazon — the complete beginner method with step-by-step diagrams, exercises, and songs.
🎬 Subscribe to Violin Explained on YouTube for video demonstrations of everything in this guide.
Written by Sergei Panov, author of the Learn Violin Fast method book series and founder of ViolinExplained.com. Sergei has taught over 500 violin students and developed this method to help beginners learn as quickly and enjoyably as possible.