Your first day with a violin should be exciting, not overwhelming. The key is knowing exactly what to focus on — and what to skip for now.
After teaching over 1,000 students their very first violin lesson, I designed the Learn Violin Fast method to make Day 1 as productive and fun as possible. Here’s the exact roadmap I use.
What Should You Do on Your First Day with a Violin?
Start by learning how the violin makes sound, hold it guitar-style, and pluck your first notes — don’t try to use the bow or play on your shoulder yet.
Most beginners make the mistake of trying to do everything at once. However, the Learn Violin Fast method breaks your first day into manageable steps that build on each other.
Before You Play: Understand Your Instrument
Before you make a single sound, take 5 minutes to understand what you’re holding. This isn’t boring theory — it’s the foundation that makes everything else click faster.
What Is Music?
At its core, music is organized sound. Sound is created by vibrations — changes in air pressure. The violin’s job is to produce and amplify those vibrations into beautiful music.
How Does the Violin Make Sound?
There are two ways to make sound on a violin:
- Plucking (pizzicato or pizz.) — pulling the string with your finger
- Bowing (arco) — drawing the bow across the string
Both methods vibrate the string, which vibrates the body of the violin, which moves the air inside — and that’s the sound you hear.
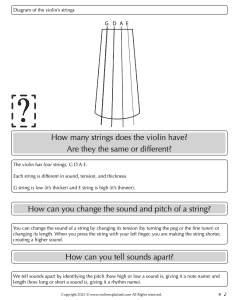
Know Your Four Strings
The violin has four strings: G, D, A, E
- G string = lowest, thickest
- D string = second lowest
- A string = second highest
- E string = highest, thinnest
You can change a string’s pitch by:
- Turning the peg or fine tuner (changes tension)
- Pressing with your left finger (changes string length = higher pitch)
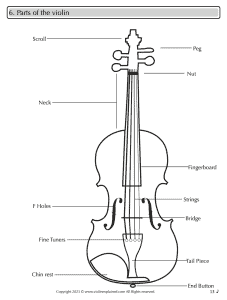
Know the Parts of Your Violin
Before playing, identify these key parts on your own instrument:
- Scroll — the decorative spiral at the top
- Pegs — turn these to tune (carefully!)
- Nut — holds the strings at the top of the neck
- Neck — where your left hand goes
- Fingerboard — where you press your fingers to change notes
- Bridge — the wooden piece that holds the strings up and transfers vibrations
- Fine tuners — small screws at the bottom for precise tuning
- Chin rest — where your chin rests when playing on the shoulder
- Tailpiece — secures the strings and fine tuners
Step 1: Hold the Violin Guitar Style
Here’s the secret that makes Day 1 so much easier: don’t put the violin on your shoulder yet.
Start by holding it like a guitar. This lets you:
- Learn to pluck and make sounds immediately
- Understand finger placement without strain
- Play your first song within minutes
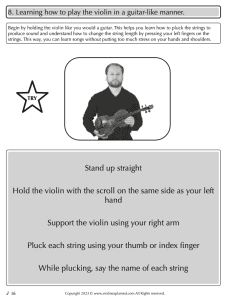
How to hold it:
- Stand up straight
- Hold the violin with the scroll on the same side as your left hand
- Support the violin using your right arm
- Pluck each string with your thumb or index finger
- Say the name of each string as you pluck: G, D, A, E
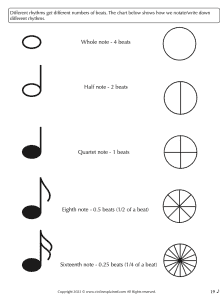
Step 2: Learn Rhythm Basics
Before playing a song, you need to understand rhythm — how long each note lasts.
 Try this right now:
- Walk at a medium-slow pace and stomp your feet at the same speed
- That steady beat is your tempo
Now apply it to the violin:
| Action | What You’re Playing |
|---|---|
| Pluck a string, count to 4 | Whole note |
| Pluck a string, count to 2 | Half note |
| Pluck a string, count to 1 | Quarter note |
| Pluck twice as fast | Eighth notes |
That’s it — you just learned the four basic rhythms!
Step 3: Learn Your First Finger Numbers
Since we can’t use our thumb to press violin strings, the fingers are numbered differently:
- Index finger = 1
- Middle finger = 2
- Ring finger = 3
- Pinky finger = 4
- Thumb = X (not used on the strings)
Piano players note: on piano, the thumb is 1. On violin, the index finger is 1. You’ll need to learn both systems!
The Rule: Keep your left hand open and fingers up and curved when pressing the strings on the tapes.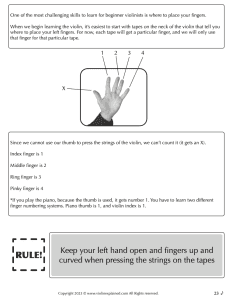
Step 4: Play Your First Song — Hot Cross Buns
Yes, you can play a song on your very first day! Hot Cross Buns uses only three notes and is the perfect first piece.
On the D string:
2  1  0  |  2  1  0  |  0 0 0 0  1 1 1 1  |  2  1  0  ||
F E D F E D D D D D E E E E F E D- 0 = open string (no fingers)
- 1 = index finger on first tape
- 2 = middle finger on second tape
Pluck each note and say the finger number (or letter) out loud. Use the Power of 10 — play it 10 times to start memorizing it.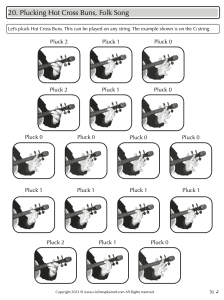
Step 5: Learn What Notes Your Fingers Make
Here’s the magic connection — each finger on each string makes a specific note:
| String | Open (0) | Finger 1 | Finger 2 | Finger 3 |
|---|---|---|---|---|
| G | G | A | B | C |
| D | D | E | F | G |
| A | A | B | C | D |
| E | E | F | G | A |
The pattern: Add a finger = add a note (next letter). Subtract a finger = subtract a note. After G, repeat back to A (there is no H note in music).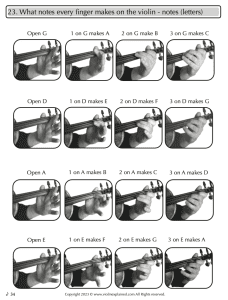
What NOT to Do on Day 1
These are the 6 most common mistakes I see beginners make on their first day:
| ❌ Don’t Do This | ✅ Do This Instead |
|---|---|
| Try to play on your shoulder immediately | Start guitar style — build comfort first |
| Pick up the bow on Day 1 | Focus on plucking — the bow comes later |
| Squeeze your left hand | Keep fingers curved and relaxed |
| Tense your shoulders | Remind your shoulders to stay down and relaxed |
| Try to learn everything at once | Focus on open strings, then fingers, then one song |
| Get frustrated if it sounds bad | Every violinist sounded bad on Day 1 — it gets better fast |
Your Day 1 Checklist
By the end of your first session, aim to:
- Name all four strings (G, D, A, E)
- Identify the main parts of your violin
- Hold the violin guitar style comfortably
- Pluck all four open strings and say their names
- Know your finger numbers (1, 2, 3, 4)
- Understand whole, half, quarter, and eighth note rhythms
- Pluck Hot Cross Buns on at least one string
- Know what note each finger makes on the D string
What Comes Next?
After Day 1, you’ll move on to:
- More songs: Twinkle Twinkle, Jingle Bells, scales
- Shoulder position: Learning to hold the violin properly on your shoulder
- The bow: Parts of the bow, bow hold, and your first bow strokes
- Reading music: Understanding the staff, note names, and sheet music
All of this is covered step-by-step in Learn Violin Fast — Book 1.
Get the Full Method
This guide gives you a roadmap for Day 1, but the book walks you through every step with detailed diagrams, exercises, quizzes, and 8 songs to learn.
👉 Get Learn Violin Fast — Book 1 on Amazon — the complete beginner method with step-by-step diagrams, exercises, and songs.
🎬 Subscribe to Violin Explained on YouTube for video demonstrations of your first violin lesson.
Written by Sergei Panov, author of the Learn Violin Fast method book series and founder of ViolinExplained.com. Sergei has taught over 1,000 violin students and developed this method to help beginners learn as quickly and enjoyably as possible.