If you’ve ever dragged your bow across the string and heard… nothing — or a faint, airy whisper — you’re not doing anything wrong. You just forgot one step: rosin.
Rosin is one of the most overlooked parts of playing the violin, but without it, your bow literally cannot make sound. In Learn Violin Fast — Book 1, I explain exactly how rosin works and why it’s essential. Let me walk you through everything.
What Does Rosin Do on a Violin Bow?
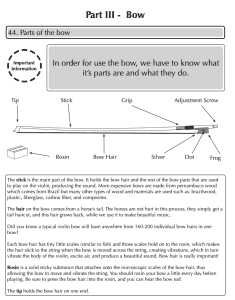
Rosin is a solid, sticky substance that coats the microscopic scales on your bow hair, allowing the hair to grip and vibrate the string. Without rosin, the bow slides across the string like ice on glass — no friction, no vibration, no sound.
The Science: How Bow Hair Makes Sound
Here’s something most beginners don’t know: each bow hair has tiny little scales, similar to fish scales. These microscopic scales hold onto the rosin.
When the rosined bow hair moves across the string, the rosin creates friction — the hair grips the string, pulls it, then releases it. This grip-and-release cycle happens hundreds of times per second, creating vibrations. Those vibrations travel through the bridge into the body of the violin, excite the air inside, and produce sound.
No rosin = no grip = no vibrations = no sound.
How to Apply Rosin to Your Bow
Applying rosin is simple, but there are a few important details:
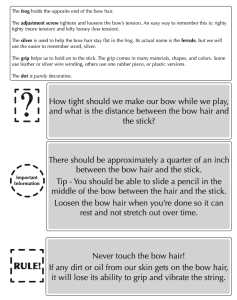
- Tighten your bow first — there should be approximately a quarter inch between the bow hair and the stick
- Hold the rosin in one hand and the bow in the other
- Press the bow hair into the rosin — don’t just lightly touch it
- Slide the bow back and forth across the rosin — from frog to tip and back
- Listen — you can actually hear the bow “eat” the rosin. There’s a slight grabbing sound as the rosin coats the hair
How Much Rosin Should You Use?
- Daily playing: A few passes back and forth before each practice session is enough
- New bow: A brand-new bow needs extra rosin the first time — about 10–15 passes — because the hair has never been rosined before
- Don’t overdo it: Too much rosin creates a dusty, gritty sound and leaves white residue on your strings and violin
You’ll know you have enough when the bow grips the string and produces a clear, full sound.
 How Often Should You Rosin Your Bow?
Rosin your bow a little every day before playing. This is a habit you should build from Day 1.
Think of it like brushing your teeth — a quick maintenance step that makes everything work better.
The #1 Rule: Never Touch the Bow Hair
This is critical: never touch the bow hair with your fingers.
Oil from your skin will coat those microscopic scales, and the bow will lose its ability to grip the string. Once the hair is contaminated with oil, even rosin can’t fix it — you’ll need a professional rehair.
When handling your bow, always hold it by the stick and frog. If you accidentally touch the hair, wipe it gently with a dry cloth, but the damage may already be done.
 Always Loosen the Bow When You’re Done
After every practice session:
- Loosen the bow hair by turning the adjustment screw to the left (lefty loosey)
- This lets the hair rest and prevents it from stretching out over time
- Never store your bow with the hair tight
When you’re ready to play again, tighten the bow until there’s about a quarter inch of space between the hair and the stick. A quick test: you should be able to slide a pencil between the hair and the stick in the middle of the bow.
Common Rosin Mistakes
| Mistake | Fix |
|---|---|
| Not rosining at all | Rosin every day before playing — even a few passes helps |
| Rosining too much | A few passes is enough — excess creates gritty sound and dust |
| Touching the bow hair | Hold the bow by the stick and frog only |
| Leaving the bow tight when storing | Always loosen after playing |
| Using old, dried-out rosin | Replace rosin if it’s cracked or glassy smooth — it should have some grip |
Quick Rosin Checklist
- Tighten bow to a quarter-inch gap before rosining
- Press hair into rosin and slide back and forth (3–5 passes for daily use)
- Listen for the grabbing sound — that means it’s working
- Never touch the bow hair with your fingers
- Loosen the bow hair when you’re done practicing
- Wipe rosin dust off your strings and violin body after playing
Get the Full Method
This guide covers rosin basics, but Learn Violin Fast — Book 1 includes the complete breakdown of bow parts, bow hair science, the bow hold, and your first bow strokes with rosin — plus 8 songs to practice with.
👉 Get Learn Violin Fast — Book 1 on Amazon — the complete beginner method with step-by-step diagrams, exercises, and songs.
🎬 Subscribe to Violin Explained on YouTube for video demonstrations of rosin application and bow care.
Written by Sergei Panov, author of the Learn Violin Fast method book series and founder of ViolinExplained.com. Sergei has taught over 1,000 violin students and developed this method to help beginners learn as quickly and enjoyably as possible.
 Try this right now: