Knowing exactly where to place your fingers on the violin is one of the biggest challenges for beginners. Unlike a guitar with frets or a piano with keys, the violin fingerboard is completely smooth — there’s nothing to tell you where to press.
That’s why in Learn Violin Fast — Book 1, I teach every student to start with tape markers on the fingerboard. These tapes act as visual guides that show you exactly where each finger goes — and they work incredibly well.
Where Do You Put Your Fingers on a Violin?
Place tape markers on the fingerboard at specific measured distances from the nut, then assign one finger per tape: index finger on tape 1, middle finger on tape 2, ring finger on tape 3, and pinky on tape 4.
Let me walk you through the complete system.
Finger Numbering on the Violin
Since we can’t use our thumb to press the strings (it supports the neck), violin fingers are numbered differently than you might expect:
- Index finger = 1
- Middle finger = 2
- Ring finger = 3
- Pinky finger = 4
- Thumb = X (not used on the strings)
- Open string = 0 (no fingers pressing)
If you play piano, note that piano starts with thumb as 1. On violin, the index finger is 1. These are two different systems!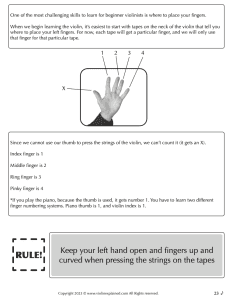
The Tape Trick Every Beginner Needs
Tapes on the fingerboard are the single best tool for learning finger placement. Each tape marks where a specific finger should press the string.
Why tapes work:
- They give you a visual target to aim for
- They help you play in tune from the start
- They build muscle memory so your fingers learn the distances
- They work on every string — the same tape positions apply to all four strings
The Rule:
For now, each tape gets one specific finger, and you only use that finger for that tape:
- Tape 1 → Index finger (1)
- Tape 2 → Middle finger (2)
- Tape 3 → Ring finger (3)
- Tape 4 → Pinky (4)
Why Are the Tapes Placed Where They Are?
This is the science behind the tape positions — and understanding it helps you play in tune.
The distance between tapes is based on whole steps and half steps:
- A whole step = 10% of the string’s length from nut to bridge
- A half step = 5% of the string’s length
This is why:
- Tapes 1 and 2 are far apart — they’re a whole step (big step)
- Tapes 2 and 3 are close together — they’re a half step (small step)
Did you notice that the distances between tapes get smaller as you go higher? That’s because each time you press a finger down, the remaining string gets shorter. As a result, 10% of a shorter string is a smaller distance. This is why higher positions on the violin have fingers closer together.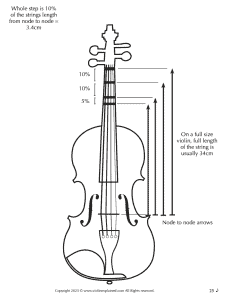
Exact Tape Measurements
If you need to add tapes to your violin, here are the exact measurements from the nut for each violin size:
Full Size (4/4) Violin:
| Tape | Distance from Nut |
|---|---|
| Tape 1 | 34mm (1 3/8 inches) |
| Tape 2 | 66mm (2 5/8 inches) |
| Tape 3 | 80mm (3 1/8 inches) |
| Tape 4 | 106mm (4 1/8 inches) |
3/4 Size Violin:
| Tape | Distance from Nut |
|---|---|
| Tape 1 | 32mm (1 1/4 inches) |
| Tape 2 | 61mm (2 3/8 inches) |
| Tape 3 | 75mm (2 7/8 inches) |
| Tape 4 | 100mm (3 7/8 inches) |
1/2 Size Violin:
| Tape | Distance from Nut |
|---|---|
| Tape 1 | 28mm (1 1/8 inches) |
| Tape 2 | 54mm (2 1/8 inches) |
| Tape 3 | 68mm (2 5/8 inches) |
| Tape 4 | 91mm (3 5/8 inches) |
1/4 Size Violin:
| Tape | Distance from Nut |
|---|---|
| Tape 1 | 25mm (1 inch) |
| Tape 2 | 48mm (1 7/8 inches) |
| Tape 3 | 60mm (2 3/8 inches) |
| Tape 4 | 79mm (3 1/8 inches) |
How to Apply Tapes:
- Cut a piece of tape about 1.5 to 2 inches long
- Slide it under the strings but on top of the fingerboard
- Place it at the correct measurement from the nut
- You can mark positions with a pencil first
Best tape to use: 1/8 inch color vinyl pinstripe tape. It’s easy to handle, doesn’t rub off, and is easy to remove and change. Avoid paper stickers or duct tape — they leave sticky residue and absorb dirt.
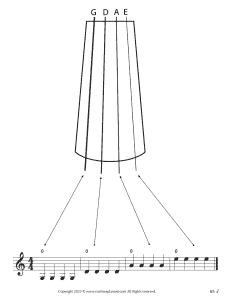
What Note Does Each Finger Make?
Here’s the complete finger-to-note chart for all four strings:
| String | Open (0) | Finger 1 | Finger 2 | Finger 3 |
|---|---|---|---|---|
| G | G | A | B | C |
| D | D | E | F | G |
| A | A | B | C | D |
| E | E | F | G | A |
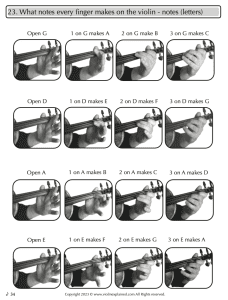 The Pattern:
- Add a finger = add a note (next letter in the alphabet)
- Subtract a finger = subtract a note (previous letter)
- After G, repeat back to A (there is no H note in music!)
So if you know the open string name, you can figure out every note. For example: Open D → add finger 1 → E → add finger 2 → F → add finger 3 → G
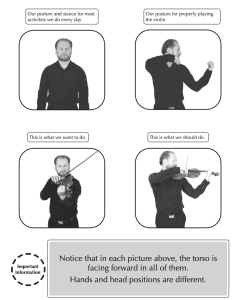
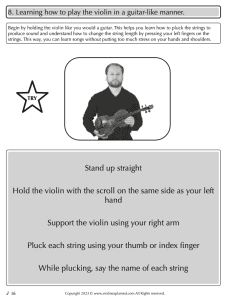
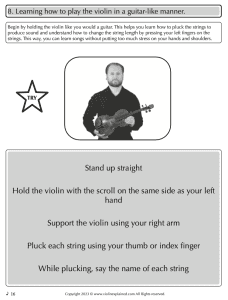
Proper Left Hand Technique
Placing your fingers correctly isn’t just about where — it’s also about how:
The Rules:
- Keep your left hand open — your wrist should NOT touch the violin’s neck
- Fingers up and curved — press with your fingertips, not flat fingers
- Your whole hand doesn’t have to squeeze — only your fingertip needs to press the string
- Wrist at 180 degrees — a straight line from elbow to hand, no bending in or out
- Knuckle and thumb support the violin — they’re the anchor points
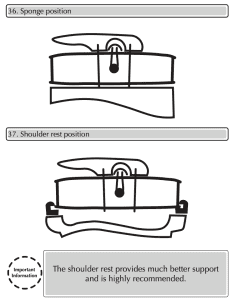
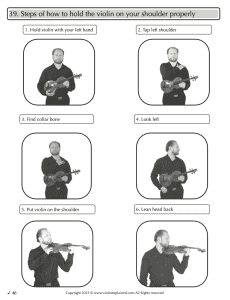
 Shoulder Awareness:
When we do difficult tasks, our shoulders tend to tense up. A raised shoulder limits your movement and causes pain.
Pay attention to what your shoulder is doing while you play, and remind it to stay relaxed and down.
Your First Song with Fingers: Hot Cross Buns
Once you know your finger numbers and tape positions, you can play your first song! Hot Cross Buns uses only fingers 0, 1, and 2.
On the D string:
2  1  0  |  2  1  0  |  0 0 0 0  1 1 1 1  |  2  1  0  ||
F  E  D     F  E  D     D D D D  E E E E     F  E  D
On the A string:
2  1  0  |  2  1  0  |  0 0 0 0  1 1 1 1  |  2  1  0  ||
C  B  A     C  B  A     A A A A  B B B B     C  B  A
Practice tip: Pluck and say the finger number out loud, then pluck and say the note letter. This builds the connection between fingers and notes.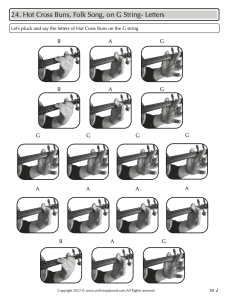
When to Remove the Tapes
This is the question every beginner asks. Here’s the answer:
Remove tapes when you can consistently play in tune without looking at them.
Signs you’re ready:
- You can play scales and songs while looking at your bow (not your left hand)
- Your fingers naturally land in the right spots
- You can hear when a note is out of tune and correct it
For most students, this takes several weeks to a few months. There’s no rush — the tapes are a tool, not a crutch. Even some advanced students keep tape 1 as a reference point.
Common Finger Placement Mistakes
| Mistake | Fix |
|---|---|
| Flat fingers (pressing with pads) | Curve your fingers — press with fingertips |
| Wrist touching the neck | Keep wrist straight at 180° — the “open hand” |
| Squeezing too hard | Only your fingertip needs to press — relax the rest |
| Fingers landing between tapes | Aim for the center of each tape |
| Not lifting unused fingers | Keep fingers hovering above the string, curved and ready |
| Raised/tense shoulder | Consciously relax and drop your shoulder |
Practice Checklist
Use the Power of 10 — do each task 10 times:
- Press each finger (1, 2, 3) on the G string and pluck — say the finger number
- Repeat on D, A, and E strings
- Say the note letter for each finger on each string (use the chart)
- Play Hot Cross Buns on D string from memory
- Play Hot Cross Buns on A string from memory
- Check: Is your hand open? Fingers curved? Wrist straight? Shoulder down?
- Play a D scale: Open D → 1 → 2 → 3 → Open A → 1 → 2 → 3
Get the Full Method
This guide covers the finger placement basics, but Learn Violin Fast — Book 1 includes the complete system — tape measurements for all violin sizes, finger-to-note charts, exercises for every string, quizzes, scales, and 8 songs that progressively build your finger skills.
👉 Get Learn Violin Fast — Book 1 on Amazon — the complete beginner method with step-by-step diagrams, exercises, and songs.
🎬 Subscribe to Violin Explained on YouTube for video demonstrations of finger placement and tape application.
Written by Sergei Panov, author of the Learn Violin Fast method book series and founder of ViolinExplained.com. Sergei has taught over 1,000 violin students and developed this method to help beginners learn as quickly and enjoyably as possible.
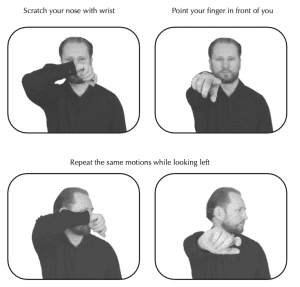
 Try this right now:
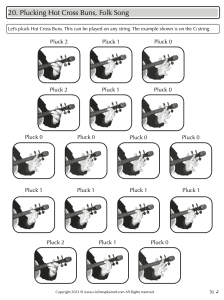

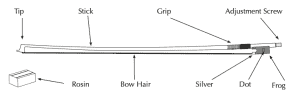 Parts of the Violin Bow:
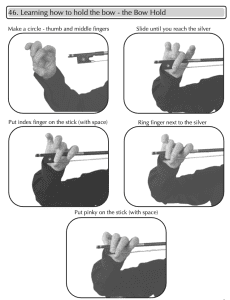 Step 1: Make a Circle with Your Thumb and Middle Finger