Bad posture is the hidden reason most beginners feel pain, tension, and frustration when playing the violin. Fix your posture and everything else — tone, technique, endurance — gets easier.
In Learn Violin Fast — Book 1, I dedicate an entire section to understanding why violin posture is so unnatural and how to train your body to hold the instrument correctly. Here’s the complete breakdown.
Why Is Violin Posture So Difficult?
Think about what your body does all day. Your hands are typically by your sides or in front of you — below your waist. When you read, write, draw, or type, your hands are always in front of you, whether up in the air or on a table. Even though you look left and right during the day, most of the time your head faces forward.
Playing the violin requires your hands to move in totally different motions and be in positions you’re simply not used to. If your hands are in front of you holding the violin, they won’t have room to move — your elbows will be stuck to your body.
The solution is to hold the violin on your shoulder — but this requires positions and motions your body has never done before. That’s why it feels uncomfortable at first.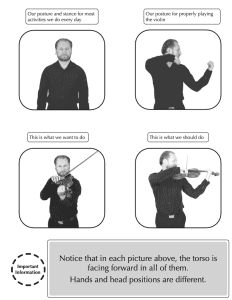
The Correct Violin Position
The proper positioning of a violin requires:
- The violin should be on your left shoulder — not in front of your chest
- The bottom center of the violin rests on your left collar bone — this is your anchor point
- The bow in the right hand is in front of your body with the hand straight
- The left hand holds the violin over to the left side
Notice that in all positions — standing or sitting — your torso faces forward. It’s your hands and head that change position, not your whole body.
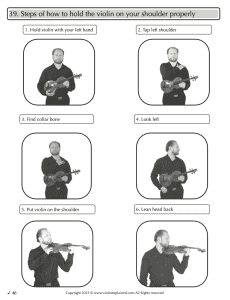
How to Hold the Violin on Your Shoulder: 6 Steps
Here is the exact step-by-step method from Learn Violin Fast:
- Hold the violin with your left hand
- Tap your left shoulder — find where the violin will sit
- Find your collar bone — this is the anchor point
- Look left — turn your head to the left
- Put the violin on the shoulder — rest it on the collar bone
- Lean your head back — let the chin rest support the weight
The #1 Posture Mistake: The Raised Shoulder
After teaching over 1,000 students, I can tell you the single most common posture problem is the raised left shoulder.
Your body naturally wants to squeeze the shoulder up to help hold the violin. But a raised shoulder creates tension, pain, and limits your range of motion.
The fix: As you play, consciously tell your shoulders to “chill” and make them go down. Check in with your shoulders every 30 seconds during practice until it becomes automatic.
Both shoulders need to stay down — not just the left one. Tension in one shoulder often spreads to the other.
Left Hand Placement and Wrist Position
With the violin on your shoulder, your left hand supports the neck:
- Your knuckle and top of the thumb support the violin neck
- Keep a space at the bottom of your hand between the index finger and knuckle — don’t let it collapse
- Your left wrist should be at 180 degrees between the elbow and hand — a straight line
- Do not bend your wrist in or out
- Do not let your wrist touch the neck of the violin
This is what we call keeping your left hand “open.”
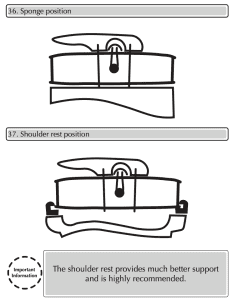
Shoulder Rest vs. Sponge
To help support the violin on your shoulder, you’ll use either a sponge or a shoulder rest:
Sponge method:
- Attach rubber bands to the violin’s end button and corners
- Place the sponge between the violin and your shoulder
Shoulder rest method:
- Clip the shoulder rest onto the bottom of the violin
- The shoulder rest provides much better support and is highly recommended
Why Memorization Helps Posture
Here’s a tip most teachers don’t mention: memorize your music.
When you look at sheet music, you can’t see your left hand, your bow position, or your posture. By memorizing your pieces, you can watch your hands and make corrections in real time.
This is one of the best practice techniques you can use. Start memorizing from the very beginning. Use the Power of 10 — play each piece 10 times to build muscle memory.
Common Posture Mistakes
| Mistake | Fix |
|---|---|
| Raised left shoulder (tension) | Consciously relax and drop your shoulder down every 30 seconds |
| Violin in front of body | Move it to the left, over your left shoulder |
| Bent wrist touching the neck | Keep wrist straight at 180° — elbow to hand in a straight line |
| Head tilted too far forward | Look left, then lean head back onto chin rest |
| Stiff, locked knees (standing) | Keep knees slightly soft, weight evenly distributed |
| Slouching (sitting) | Sit at the front edge of the chair, feet flat, back straight |
Posture Checklist
Use this before every practice session:
- Feet shoulder-width apart (standing) or flat on the floor (sitting)
- Both shoulders relaxed and down
- Violin on left shoulder, resting on collar bone
- Head turned left, jaw resting on chin rest — not clamping
- Left wrist straight — 180 degrees, not touching the neck
- Space between index finger and knuckle (open left hand)
- Right arm free to move — not pressed against body
Get the Full Method
This guide covers violin posture basics, but Learn Violin Fast — Book 1 includes detailed photo diagrams of every position, the complete 6-step shoulder method, left hand placement close-ups, and exercises to build muscle memory.
👉 Get Learn Violin Fast — Book 1 on Amazon — the complete beginner method with step-by-step diagrams, exercises, and songs.
🎬 Subscribe to Violin Explained on YouTube for video demonstrations of proper violin posture.
Written by Sergei Panov, author of the Learn Violin Fast method book series and founder of ViolinExplained.com. Sergei has taught over 1,000 violin students and developed this method to help beginners learn as quickly and enjoyably as possible.