Posted on Leave a comment

How to Read Sheet Music for Violin: A Beginner’s Visual Guide

Reading sheet music is one of the most valuable skills you can learn as a violinist — it opens the door to playing any piece of music ever written.

The good news? It’s not as hard as it looks. In Learn Violin Fast — Book 1, I teach students to read music using simple visual connections between the staff and the violin. Most beginners can read basic violin sheet music in about 10 minutes using the method below.

Can You Learn to Read Violin Sheet Music Quickly?

Yes — by understanding that the staff is simply a visual graph where high notes are up and low notes are down, and by using memory tricks like FACE for spaces and “Every Good Burger Deserves Fries” for lines.

Let’s break it all down step by step.
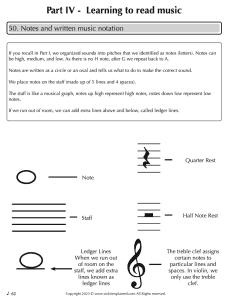
What Is the Staff?

The staff is where all written music lives. Think of it as a musical graph.

  • The staff is made up of 5 lines and 4 spaces
  • Notes up high on the staff represent high-pitched sounds
  • Notes down low on the staff represent low-pitched sounds
  • Notes are always counted from the bottom up — just like climbing a ladder
  • If we run out of room, we add extra lines above or below called ledger linesImage of Page from Learn Violin Fast Book 1 showing and explaining the basics of music notation

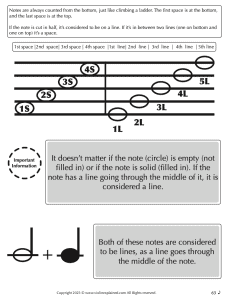
Lines vs. Spaces: How to Tell the Difference

This is a simple but important concept:

  • If a line goes through the middle of the note — it’s on a line
  • If the note sits between two lines (one on bottom, one on top) — it’s in a space
  • It doesn’t matter if the note is filled in (solid) or empty (hollow) — the rule is the sameImage of showing notes on the staff with lines and spaces

What Is a Note?

Notes are written as a circle or oval shape. A note tells you two things:

  1. What pitch to play — determined by where it sits on the staff (high or low)
  2. How long to play it — determined by what the note looks like (filled, hollow, with stem, etc.)

We’ll cover pitch first, then rhythm.

Note Names on the Staff

There are only 7 note names in music: A, B, C, D, E, F, G. After G, we repeat back to A. These same 7 letters repeat over and over, getting higher each time.
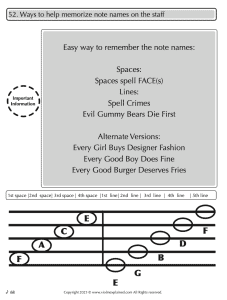
Space Notes: FACE

The notes in the spaces of the treble clef staff spell FACE from bottom to top:

  • 1st space: F
  • 2nd space: A
  • 3rd space: C
  • 4th space: E

Easy — just remember FACE!

Line Notes: Every Good Burger Deserves Fries

The notes on the lines from bottom to top are E, G, B, D, F. Use one of these memory tricks:

  • Every Good Burger Deserves Fries
  • Every Good Boy Does Fine
  • Every Girl Buys Designer Fashion
  • Evil Gummy Bears Die FirstImage of musical notes on the staff, what are the notes on the spaces and lines.

The Stem Rule

Most notes on the staff have stems — vertical lines attached to the note head. Here’s the rule for which direction they point:

  • Notes below the 3rd line → stem points up (on the right side of the note)
  • Notes above the 3rd line → stem points down (on the left side of the note)
  • Notes on the 3rd line → stem can go either way

Important: The direction of the stem does not change the note. A D with a stem up is the same as a D with a stem down.Images showing stems on the notes can go up or down on the 3rd line

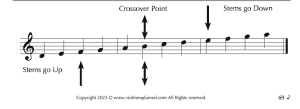
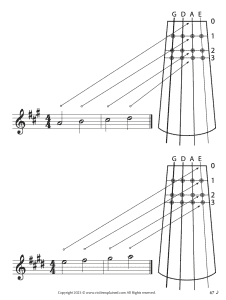
Connecting the Staff to the Violin

Here’s where it all clicks. In Learn Violin Fast, I teach students to visually connect the staff to the violin’s four strings:

  • The G string (lowest) = notes written low on the staff (below the staff, using ledger lines)
  • The D string = notes on the lower part of the staff
  • The A string = notes on the upper part of the staff
  • The E string (highest) = notes written high on the staff (above the staff, using ledger lines)

Think of it this way: the staff is a map of your violin. Low strings = low on the staff. High strings = high on the staff.Image connecting the notes on the staff to the violinImage connecting the notes on the staff to the violin

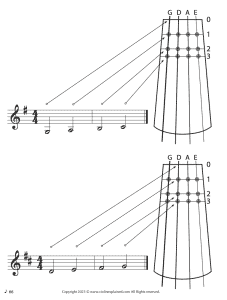
Understanding Rhythm: How Long to Play Each Note

Now that you know what note to play, you need to know how long to play it. This is rhythm.

Here’s a simple way to feel rhythm: walk at a medium-slow pace and stomp your feet at the same speed. That steady beat is your tempo.

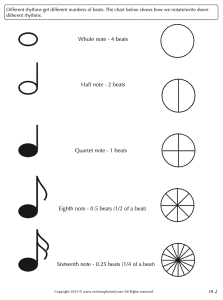
The 4 Basic Note Types:

Note Type What It Looks Like How Long How to Practice
Whole note Hollow circle, no stem 4 beats Pluck a string, count to 4
Half note Hollow circle with stem 2 beats Pluck a string, count to 2
Quarter note Filled circle with stem 1 beat Pluck a string, count to 1
Eighth note Filled circle with stem + flag ½ beat Pluck twice as fast

Image showing note lengths and typesVisual Spacing Trick

One of the best ways to read rhythm correctly is to look at the spacing between notes:

  • Long notes (whole, half) have lots of space around them on the staff
  • Short notes (quarter, eighth) are squeezed closer together

The spacing isn’t always perfectly accurate, but it’s close enough to help you feel the rhythm visually.Image showing the spacing between notes can be visually seen between the distance between the notes

Key Terms:

  • Rhythm = how long or how many beats a note/sound lasts
  • Tempo = the speed of a piece or song
  • Andante = medium-slow tempo, like walking speed

The length of a note and the speed of the piece are not the same thing. A whole note is always 4 beats — but those beats can be fast or slow depending on the tempo.

Reading Your First Music on the Staff

Once you understand note names and rhythm, you’re ready to read real music! In Learn Violin Fast — Book 1, Part V walks you through reading and playing:

  • Open strings on the staff
  • G, D, and A scales — reading from notation
  • Hot Cross Buns on all four strings — from the staff
  • Twinkle Twinkle Little Star — full notation
  • Jingle Bells — full notation

Each piece builds on the last, so by the time you finish Part V, you’re reading and playing real music from sheet music.

Music violin notes of Twinkle Twinkle Little StarCommon Mistakes When Reading Sheet Music

Mistake Fix
Confusing lines and spaces If a line goes through the note’s middle = line. If it sits between = space
Forgetting note names Use FACE (spaces) and Every Good Burger Deserves Fries (lines)
Ignoring rhythm Count out loud! Say “1-2-3-4” for whole notes, “1-2” for half notes
Not connecting staff to violin Remember: low on staff = G string, high on staff = E string
Reading too fast Start slow — accuracy first, speed comes with practice

Practice Checklist

Use the Power of 10 — do each task 10 times to build muscle memory:

  • Name all the space notes (FACE) from bottom to top
  • Name all the line notes (EGBDF) from bottom to top
  • Point to random notes on a staff and name them
  • Identify whole, half, quarter, and eighth notes by sight
  • Read and pluck Hot Cross Buns from the staff notation
  • Read and play a D scale from the staff
  • Clap the rhythm of a simple piece before playing it

Get the Full Method

This guide covers the basics of reading sheet music, but Learn Violin Fast — Book 1 includes the complete visual system — staff diagrams, string-to-staff connection charts, the rhythm note chart, quizzes to test yourself, and 8 songs to read and play from notation.

👉 Get Learn Violin Fast — Book 1 on Amazon — the complete beginner method with step-by-step diagrams, exercises, and songs.

🎬 Subscribe to Violin Explained on YouTube for video demonstrations of reading sheet music and playing your first songs.


Written by Sergei Panov, author of the Learn Violin Fast method book series and founder of ViolinExplained.com. Sergei has taught over 1,000 violin students and developed this method to help beginners learn as quickly and enjoyably as possible.

Posted on Leave a comment

How to Hold a Violin Bow: 6 Steps to a Perfect Bow Hold

The bow hold is the most important technique in violin playing — it controls your tone, volume, and expression. A bad bow hold leads to scratchy sound, tension, and frustration.

In Learn Violin Fast — Book 1, I break the bow hold down into simple steps that any beginner can follow. But before we pick up the bow, you need to know what you’re holding.

How Do You Hold a Violin Bow?

Place your thumb and middle finger in a circle on the bow’s frog, then add your index finger on the stick, ring finger next to the silver (ferrule), and pinky on top of the stick — all with curved, relaxed fingers.

That’s the short version. Let me walk you through every detail.

First: Know Your Bow Parts

Before learning the bow hold, you need to understand the parts of the bow and what they do. In my experience, students who understand why each part matters learn the bow hold faster.

Diagram of the violin bow and it's parts
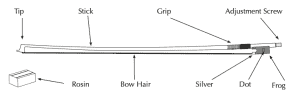
Parts of the Violin Bow:

  • Stick — The main part of the bow. Holds the hair and all other parts. Made from pernambuco wood (expensive), brazilwood, carbon fiber, fiberglass, or composites
  • Hair — Comes from a horse’s tail (the horses are not hurt — they simply get a tail haircut!). A typical bow has 160–200 individual hairs
  • Rosin — A solid sticky substance that coats the bow hair, allowing it to grip and vibrate the string to produce sound
  • Tip — Holds the bow hair on one end
  • Frog — Holds the bow hair on the opposite end (this is where your hand goes)
  • Adjustment screw — Tightens and loosens bow tension. Remember: righty tighty, lefty loosey
  • Silver (ferrule) — Keeps the bow hair flat in the frog. Its real name is the ferrule, but “silver” is easier to remember
  • Grip — Helps you hold the stick. Comes in leather, rubber, plastic, or silver wire winding
  • Dot — Purely decorative

How Bow Hair Makes Sound

Each bow hair has tiny scales — similar to fish scales — that hold onto the rosin. When the bow moves across the string, the rosin makes the hair stick to the string, creating vibrations. Those vibrations travel through the bridge into the body of the violin, excite the air inside, and produce a beautiful sound.

This is why you should never touch the bow hair with your fingers. Oil from your skin will coat the scales and the bow will lose its ability to grip the string.

How Tight Should the Bow Be?

There should be approximately a quarter of an inch between the bow hair and the stick when tightened for playing.

Quick test: You should be able to slide a pencil between the hair and the stick in the middle of the bow.

Important: Always loosen the bow hair when you’re done playing so it can rest and not stretch out over time.

How to Hold a Violin Bow: 6 Steps

Here is the exact method I teach in Learn Violin Fast — Book 1:

Diagram and pictures of how to make a proper violin bowhold in 6 steps
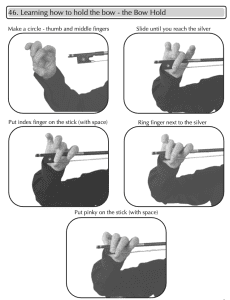
Step 1: Make a Circle with Your Thumb and Middle Finger

Touch the tips of your thumb and middle finger together to form a round “O” shape. This is the foundation of your entire bow hold. Keep it relaxed — don’t squeeze.

Step 2: Slide Until You Reach the Silver

Place this circle onto the bow at the frog and slide your fingers until your thumb reaches the silver (ferrule). Your thumb should be bent, not locked straight.

Step 3: Place Your Index Finger on the Stick

Rest your index finger on the stick, with a small space between it and the middle finger. The stick should contact your index finger between the first and second knuckle.

Step 4: Place Your Ring Finger Next to the Silver

Your ring finger goes right next to the silver, close to your middle finger. It provides support and balance.

Step 5: Place Your Pinky on Top of the Stick

Your pinky goes on top of the stick, curved and resting on its tip. This is the most important finger in the bow hold — it acts as a counterbalance, especially when playing at the tip of the bow.

Step 6: Check Your Hold

All fingers should be:

  • Curved (not flat or locked)
  • Relaxed (not squeezing)
  • Spaced (not bunched together)

Your thumb should be bent and opposite your middle finger.

The Pinky Trick That Fixes 90% of Bow Hold Problems

Here’s the secret most teachers don’t emphasize enough: your pinky is the key to the entire bow hold.

When beginners play, the bow feels heavy at the tip. The natural reaction is to squeeze harder with the thumb and index finger. However, this creates tension, a scratchy sound, and eventually pain.

The fix? Keep your pinky curved and on top of the stick. It acts as a counterweight. When your pinky is doing its job, your other fingers can stay relaxed.

If your pinky keeps collapsing flat or falling off the bow, practice this:

  1. Hold the bow vertically (tip pointing up)
  2. Balance it using only your thumb and pinky
  3. Practice tapping your other fingers on and off the stick

As a result, this builds pinky strength and awareness.

Bow Motion: The “Scratch-You” Technique

Once you have a solid bow hold, you need to learn the motion of bowing. In Learn Violin Fast, I teach a simple way to remember the bow motion:

  1. Scratch your nose with your wrist — that inward motion
  2. Point your finger in front of you — that outward motion

That’s the direction of the bow: in and out, like scratching and pointing.

Think: “Scratch — You”

First, practice these motions without the violin. Next, try them while holding the bow. Finally, apply them on the strings.

Pictures of how to properly make violin bow motion

Playing Your First Bow Strokes

Now let’s put it all together. With the violin on your shoulder and the bow in your hand:

  1. Place the bow on the string — halfway between the bridge and the fingerboard (this is called the highway or sounding point)
  2. Keep the bow at 90 degrees to the string
  3. Don’t press hard — for now, just move the bow in and out gently
  4. Play full bows — from frog to tip and back on all four strings

Key Tips for Your First Bow Strokes:

  • Bow placement matters: Stay on the highway (halfway between bridge and fingerboard)
  • 90 degrees: The bow should be perpendicular to the strings
  • Light pressure: Let the weight of the bow do the work
  • Relax your shoulders: Tell your shoulders to “chill” and keep them down
  • Think in tracks: Each string has its own plane — the bow goes right and left, not up and down

Common Bow Hold Mistakes

Mistake Fix
Flat pinky (collapsed) Curve it and place on tip — practice the vertical balance exercise
Locked/straight thumb Bend your thumb — it should be flexible
Squeezing too hard Relax — if your hand hurts, you’re gripping too tight
Index finger too close to middle Keep space between all fingers
Bow bouncing on the string Slow down, use less pressure, stay on the highway
Bow sliding toward the fingerboard Watch your contact point — keep it halfway to the bridge

Rosin: Don’t Forget This Step

Before you play, you need to rosin your bow every day. Rosin is what allows the bow hair to grip the string.

  • Press the bow hair into the rosin and slide back and forth
  • You can actually hear the bow “eat” the rosin — a slight grabbing sound
  • A few passes is enough — you don’t need a lot
  • New bows need extra rosin the first time (10–15 passes)

Practice Checklist

Use the Power of 10 — do each task 10 times to build muscle memory:

  • Practice making the bow hold circle (thumb + middle finger)
  • Form the complete bow hold with all 5 fingers
  • Vertical bow balance exercise (thumb + pinky only)
  • “Scratch-You” motion without the bow
  • “Scratch-You” motion with the bow
  • Full bow strokes on each open string (G, D, A, E)
  • Check: Is your pinky curved? Thumb bent? Shoulders relaxed?

Get the Full Method

This guide covers the bow hold basics, but Learn Violin Fast — Book 1 includes detailed photos, the complete bow parts quiz, bowing exercises on all four strings, and 8 songs to play with the bow.

👉 Get Learn Violin Fast — Book 1 on Amazon — the complete beginner method with step-by-step diagrams, exercises, and songs.

🎬 Subscribe to Violin Explained on YouTube for video demonstrations of the bow hold and bowing technique.


Written by Sergei Panov, author of the Learn Violin Fast method book series and founder of ViolinExplained.com. Sergei has taught over 1,000 violin students and developed this method to help beginners learn as quickly and enjoyably as possible.

Posted on Leave a comment

How to Hold a Violin for the First Time — The Complete Beginner’s Guide

Holding a violin correctly is the single most important skill you’ll learn as a beginner — get it right from Day 1 and everything else becomes easier.

Having taught over 500 students, I can tell you that most beginners struggle not because they lack talent, but because they try to play on the shoulder before their body is ready. In my method book Learn Violin Fast — Book 1, I teach a two-stage approach that makes holding the violin feel natural from the very first lesson.

How Do You Hold a Violin for the First Time?

Hold the violin like a guitar first to learn the basics without strain, then transition to the shoulder position once your hands are comfortable with the strings and notes.

This two-stage approach — guitar style first, shoulder style second — is the foundation of the Learn Violin Fast method. It lets you start making music immediately while your body builds the strength and muscle memory needed for the traditional shoulder position.

Stage 1: Guitar Style (Your First Days)

Before putting the violin on your shoulder, start by holding it like a guitar. This is how I begin every new student’s journey in Learn Violin Fast — Book 1.

Why Start Guitar Style?

  • You can learn to pluck the strings and produce sound right away
  • You understand how finger placement changes pitch without the stress of balancing the instrument
  • Your hands and shoulders aren’t under strain, so you can focus on learning notes and songs
  • You can learn your first songs within minutes (Hot Cross Buns, Twinkle Twinkle)

How to Hold the Violin Guitar Style:

  1. Stand up straight — good posture starts here
  2. Hold the violin with the scroll on the same side as your left hand — the neck points to your left
  3. Support the violin using your right arm — cradle the body against you
  4. Pluck each string using your thumb or index finger — say the name of each string as you pluck (G, D, A, E)

This position lets you learn all the basics — open strings, finger placement, reading music, and even your first songs — before you ever put the violin on your shoulder.

Stage 2: Holding the Violin on Your Shoulder

Once you’re comfortable with the notes and can pluck simple songs, it’s time to transition to the shoulder position. This is where most beginners get frustrated — but it doesn’t have to be hard if you understand why it feels awkward.

Why Is the Shoulder Position So Difficult?

Think about what your body does all day. Your hands are typically by your sides or in front of you — below your waist. When you read, write, or type, your hands are always in front of you.

Playing the violin requires your hands to move in totally different motions and be in positions you’re simply not used to. That’s why it feels uncomfortable at first — it’s not you, it’s biology.

The Proper Violin Position:

  • The violin should be on your left shoulder
  • The bottom center of the violin rests on your left collar bone
  • The bow in the right hand is in front of your body with the hand straight
  • The left hand holds the violin over to the left side

How to Hold a Violin on Your Shoulder: 6 Steps

Here is the exact step-by-step method I teach in Learn Violin Fast:

  1. Hold the violin with your left hand
  2. Tap your left shoulder — find where the violin will sit
  3. Find your collar bone — this is the anchor point
  4. Look left — turn your head to the left
  5. Put the violin on the shoulder — rest it on the collar bone
  6. Lean your head back — let the chin rest support the weight

Pro tip: Your left shoulder will want to squeeze up. Train your shoulder to relax and keep it down. This is the #1 mistake I see beginners make — a tense, raised shoulder leads to pain and bad habits.

Do You Need a Shoulder Rest or Sponge?

To help support the violin on your shoulder, you’ll use either a sponge or a shoulder rest.

Sponge Method:

  • Attach two small rubber bands (or one large one) to the violin’s end button and corners of the C bout
  • Place the sponge between the violin and your shoulder

Shoulder Rest Method:

  • Simply clip the shoulder rest onto the bottom of the violin
  • The shoulder rest provides much better support and is highly recommended

Left Hand Placement

With the violin on your shoulder, your left hand supports the neck of the violin:

  • Your knuckle and top of the thumb support the violin neck
  • Keep a space at the bottom of your hand between the index finger and knuckle
  • Your left wrist should be at 180 degrees between the elbow and hand — a straight line
  • Do not bend your wrist in or out, and don’t let it touch the neck of the violin

This is what we call keeping your left hand “open.”

Common Mistakes When Holding a Violin

Based on my experience teaching hundreds of students, here are the most common mistakes:

Mistake Fix
Raised left shoulder (tension) Consciously relax and drop your shoulder down
Violin sliding off shoulder Use a shoulder rest (not just a sponge)
Wrist bent inward touching the neck Keep wrist straight — 180° from elbow to hand
Holding violin in front of body Move it to the left, over your left shoulder
Gripping too hard with chin Rest your jaw lightly on the chin rest — don’t clamp
Trying shoulder position too soon Start guitar style first, build comfort with notes

Practice Checklist

Use the Power of 10 — do each task 10 times to build muscle memory:

  • Hold violin guitar style and pluck each open string (G, D, A, E)
  • Attach shoulder rest and place violin on shoulder
  • Follow the 6 steps to proper shoulder position
  • Check left hand placement (open wrist, thumb position)
  • Pluck open strings on the shoulder
  • Play Hot Cross Buns guitar style, then on the shoulder

Get the Full Method

This guide covers the basics, but there’s so much more in the book — finger placement charts, note-by-note exercises, and 8 songs to learn in Book 1 alone.

👉 Get Learn Violin Fast — Book 1 on Amazon — the complete beginner method with step-by-step diagrams, exercises, and songs.

🎬 Subscribe to Violin Explained on YouTube for video demonstrations of everything in this guide.


Written by Sergei Panov, author of the Learn Violin Fast method book series and founder of ViolinExplained.com. Sergei has taught over 500 violin students and developed this method to help beginners learn as quickly and enjoyably as possible.