Posted on Leave a comment

Ear Training for Violin: How to Hear and Name Intervals

On the violin, your ear is the boss. There are no frets and no keys telling you where the note is — so your ear has to tell your finger whether the note was too high, too low, or just right. The good news: you can train that ear in a few minutes a day, without sitting through a music-theory marathon.

If you teach, this is the part that always feels impossible — most ensembles simply don’t have the time to teach detailed theory. But you don’t need a whole unit on it. You need a small handful of ideas and a way to practice them. In Learn Violin Fast — Book 2, I lean on the ear constantly for intonation. Here’s the quick path I use to teach students to name intervals and become better listeners.

What Is an Interval?

An interval is simply the distance between two notes. That’s the whole idea. If you can hear two notes and know how far apart they are, you can find them on your instrument without guessing.

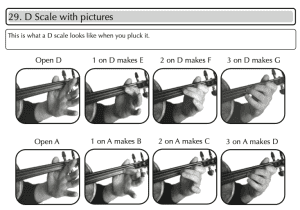
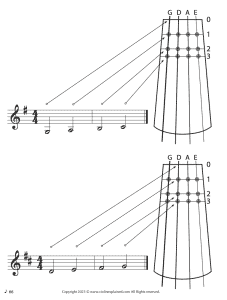
The fastest way to see intervals is to draw a scale using just the letter names, from the bottom note up. Here’s a D major scale:

D   E   F#   G   A   B   C#   D

Now you can picture a scale climbing from the bottom note — its tonic — all the way up to the top tonic. The tonic is home base.

Number the Notes to Name the Interval

Here’s the trick that connects notes to interval sizes: number the scale.

Note Number
D 1 (tonic)
E 2
F# 3
G 4
A 5
B 6
C# 7
D 8 (octave)

To name an interval, you count the distance between the notes — including both the first and the second note. So:

  • D to E is a 2nd (notes 1 and 2)
  • D to F# is a 3rd (1, 2, 3)
  • D to G is a 4th (1, 2, 3, 4)
  • D to A is a 5th (1, 2, 3, 4, 5)

That’s it. The name of an interval is just how many letters you count from the bottom note to the top, counting both ends.

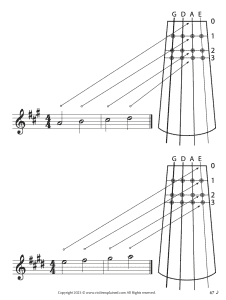
Connect Intervals to Your Strings

Here’s the part string players have a head start on: the violin, viola, and cello are all tuned in fifths.

Look at your open strings — G, D, A, E. From D to A is a 5th. From G to D is a 5th. You already own the sound of a perfect fifth, because it’s the sound of two open strings ringing together. Use it as your anchor.

From → To Interval
G → D (open strings) Perfect 5th
D → A (open strings) Perfect 5th
A → E (open strings) Perfect 5th

Major and Minor Thirds Live on Your Tapes

Thirds are where ear training gets useful fast, because the difference between a major third and a minor third is the difference between “happy” and “sad” — and you can feel it under your fingers.

A third spans two letters of the scale, but it comes in two sizes:

  • A major 3rd is two whole steps. From open D up to F# on the second tape of the D string is a major third — bright and happy.
  • A minor 3rd is a step and a half. From open D up to F natural — between the first and second tape — is a minor third — darker and sadder.
Play on the D string Top note Interval Sound
Open D → 2nd tape F# Major 3rd Bright / happy
Open D → between 1st & 2nd tape F natural Minor 3rd Dark / sad

Play those two back to back a few times. That tiny slide of the finger — about half a step — is the entire difference between major and minor. Once your ear locks onto it, you start hearing it everywhere.

How to Actually Train Your Ear

Knowing the names is step one. Hearing them in real time is the skill — and that only comes from reps with immediate feedback. That feedback loop is everything: if you guess wrong and find out right away, your ear corrects itself fast. If you guess wrong and never know, you just rehearse the mistake.

This is exactly what I built the ear training exercises at NoteFest.com to do. You listen to two notes and answer — and it tells you instantly whether you were right. Here’s the order I’d take a student (or yourself) through:

Step What you practice The question
1. Direction Higher, lower, or the same “Is the second note higher, lower, or the same as the first?”
2. Seconds Minor vs major 2nds “Which second did you hear?”
3. Thirds Minor vs major 3rds “Happy third or sad third?”
4. Fourths & Fifths Perfect 4ths and 5ths “Is it a fourth or that open-string fifth?”
5. Sixths & Sevenths The wider intervals “How far apart now?”
6. The Challenge Every interval, unison to octave “Name it — all of them, in any order”

Start with plain higher / lower / same. It sounds almost too simple, but it builds the foundation — you’re teaching the ear to notice direction before it worries about distance. Get a few wrong, get the instant correction, and move on. Then step up to seconds, thirds, fourths and fifths, sixths and sevenths, and finally the full challenge that mixes everything from unison all the way to the octave.

And keep making the connection back to your instrument. When you drill minor vs major thirds in the exercise, remember: that is D to F# versus D to F natural on your D string. The screen and the fingerboard are teaching the same thing.

Watch It in 60 Seconds

Here’s the whole idea — counting intervals, connecting them to your strings, and practicing them — in a short video:

https://www.youtube.com/watch?v=4DoBNE7e5nI

👉 Watch “How to teach students to be better listeners” on YouTube

For Teachers: The Five-Minute Version

If you run an ensemble and theory time is scarce, you don’t need a unit on this. You need five minutes and a routine:

  1. Anchor on the open-string fifth. Have the section play two open strings — that ringing sound is a perfect fifth.
  2. Show one contrast. Major third (D→F#) vs minor third (D→F natural) on the D string. Happy vs sad. That’s the lesson.
  3. Send them to drill it. Point students to the ear training exercises so the reps happen outside of class, with feedback you don’t have to give one at a time.
  4. Spot-check by ear. Play two notes; ask the room “higher or lower?” then “major or minor?” Thirty seconds, real engagement.

Ear Training Tips

Tip Why It Works
Sing the two notes before you play them Your voice can’t hide — it reveals whether you actually hear the interval
Use open strings as reference points The perfect fifth is free and always in tune — anchor everything to it
Drill in short bursts Five focused minutes beats one long session — the ear fatigues fast
Always get immediate feedback Right-or-wrong on the spot is what rewires your ear; guessing in the dark doesn’t
Connect every interval to a finger “Major third = F# on the second tape” makes the sound physical and memorable
Use the Power of 10 Ten reps of an interval per session builds recognition into reflex

Practice Challenge

  1. Direction: Have someone play two notes — call out higher, lower, or same. 10 times.
  2. Thirds on the D string: Play D→F# (major) and D→F natural (minor) back to back until you can hear the difference with your eyes closed.
  3. Name the fifth: Play any two open strings and confirm out loud — “that’s a fifth.”
  4. Go digital: Run the higher/lower exercise, then the thirds challenge, at NoteFest.com. Beat your last score.
  5. The full challenge: Once seconds through sevenths feel solid, try the all-intervals challenge from unison to octave.

Keep Building Your Ear

A trained ear is what lets you play in tune without tapes, learn music faster, and actually enjoy the sound you’re making. In Learn Violin Fast — Book 2, I show how the ear and intonation work together — including forced vibration, the technique that lets your violin physically tell you when you’re in tune.

👉 Get Learn Violin Fast — Book 2 on Amazon — master intonation, bow control, and sound production with step-by-step exercises.

🎧 Practice intervals free at NoteFest.com — ear training exercises with instant feedback, from higher/lower all the way to the full interval challenge.

🎬 Subscribe to Violin Explained on YouTube for short, practical violin lessons.


Written by Sergei Panov, author of the Learn Violin Fast method book series and founder of ViolinExplained.com. Sergei has taught over 1,000 violin students and developed this method to help beginners learn as quickly and enjoyably as possible.

Posted on Leave a comment

Violin Scales for Beginners: Your First Scales and Why They Matter

Scales are the building blocks of all music. Every melody, every song, every concerto you’ll ever play is built from scales. Learn your scales and you learn the DNA of music itself.

In Learn Violin Fast — Book 1, I introduce scales early because they’re that important. Book 2 expands into two-octave scales and new finger patterns. Here’s your complete beginner guide.

Pictures of how to play D Major Scale on violinWhat Is a Scale?

A scale is eight consecutive notes that start and end with the same note.

That’s it. Eight notes. Same starting and ending note. The notes go up in order — no skipping.

Examples:

  • D scale: D E F G A B C D
  • G scale: G A B C D E F G
  • A scale: A B C D E F G A

The first note of a scale is called the tonic — it’s home base. Every scale starts from home and returns to home.

Description of what is a scaleWhy Scales Matter

Here’s a fact that will save you hundreds of hours: if you can play your scales well, you can play almost any piece of music in that key.

Scales contain every note you’ll need. They train your fingers to move in the patterns that songs actually use. When you learn a D major scale, every song in D major becomes easier because your fingers already know where to go.

Think of scales as the alphabet. You need to know your ABCs before you can read words and sentences. Scales are the musical alphabet.

Your First Scale: D Major

The D major scale is the easiest scale on the violin because it uses two open strings and follows the natural tape positions.

D Major Scale — One Octave

Play on D and A strings:

Note String Finger
D D string Open (0)
E D string 1st finger
F D string 2nd finger
G D string 3rd finger
A A string Open (0)
B A string 1st finger
C A string 2nd finger
D A string 3rd finger

Notice the pattern: Open → 1 → 2 → 3 → Open (next string) → 1 → 2 → 3.

You start on D and end on D — one octave higher.

The G Major Scale

G Major Scale — One Octave

Play on G and D strings:

Note String Finger
G G string Open (0)
A G string 1st finger
B G string 2nd finger
C G string 3rd finger
D D string Open (0)
E D string 1st finger
F# D string 2nd finger
G D string 3rd finger

Notice that in G major, the F becomes F# (F sharp). This is because of the key signature — more on that below.

Image of violin notes for basic beginner scalesG Major Scale — Two Octaves

Book 2 teaches the two-octave G major scale, which continues across more strings. The two-octave scale is essential for building finger fluency and navigating the fingerboard.

The A Major Scale

A Major Scale — One Octave

Play on A and E strings:

Note String Finger
A A string Open (0)
B A string 1st finger
C# A string 2nd finger
D A string 3rd finger
E E string Open (0)
F# E string 1st finger
G# E string 2nd finger
A E string 3rd finger

A major has three sharps: F#, C#, and G#. Your fingers stay on the tapes for this scale.

What Makes a Scale Sound Like a Scale?

Every major scale follows the exact same pattern of whole steps and half steps:

Whole – Whole – Half – Whole – Whole – Whole – Half

This pattern is what gives a major scale its characteristic “happy” sound. If you change the pattern, you get a different type of scale (like minor — which sounds “sad”).

Why Do Scales Have Sharps and Flats?

The natural notes (A B C D E F G) have uneven spacing between them. Between most notes there’s a whole step, but between B–C and E–F, there’s only a half step.

When you start a scale on any note other than C, you need to adjust certain notes with sharps or flats to maintain the Whole-Whole-Half-Whole-Whole-Whole-Half pattern.

That’s why:

  • G major has 1 sharp (F#)
  • D major has 2 sharps (F# and C#)
  • A major has 3 sharps (F#, C#, and G#)

Key Signatures

A key signature appears at the beginning of every piece of music, right after the clef and before the time signature. It tells you which notes are sharp or flat throughout the entire piece.

Instead of writing a sharp symbol next to every single F in a G major piece, the key signature puts one sharp at the beginning — meaning “every F in this piece is F#.”

Common Violin Key Signatures

Key Sharps/Flats
C major No sharps or flats
G major 1 sharp (F#)
D major 2 sharps (F#, C#)
A major 3 sharps (F#, C#, G#)

Picture of violin notes for relative minor scales for beginnersMinor Scales

Every major scale has a relative minor. If you start 3 half steps lower using the same notes, you get a minor scale — a different-sounding scale that uses the same key signature.

For example:

  • C majorA minor (A is 3 half steps below C)
  • G majorE minor
  • D majorB minor
  • A majorF# minor

Same notes, same key signature — but a different starting point creates a completely different feel and mood.

Scale Practice Tips

Tip Why It Works
Start slowly Accuracy matters more than speed — get every note in tune first
Say the note names out loud Reinforces the connection between finger position and note name
Use the Power of 10 Play each scale 10 times per practice session
Play with a metronome Builds rhythmic consistency
Practice going up AND down Coming down is a different skill — don’t skip it
Listen for the ring When notes are in tune, open strings will vibrate (forced vibration)
Try different rhythms Play scales with whole notes, half notes, quarter notes, eighth notes

Scale Practice Challenge

  1. D major — one octave, up and down, 10 times
  2. G major — one octave, up and down, 10 times
  3. A major — one octave, up and down, 10 times
  4. From memory — write down the notes of each scale without looking
  5. Eyes closed — try plucking the D scale with your eyes closed (it’s harder than you think!)

As a challenge, try plucking scales while walking around the room (with your eyes open, please!).

Get the Full Method

This guide covers scale basics, but Learn Violin Fast — Book 1 includes the complete scale system with diagrams, fingering charts, and exercises. Book 2 expands into two-octave scales, G major with Low 2’s, and pieces that put your scales to work.

👉 Get Learn Violin Fast — Book 1 on Amazon — the complete beginner method with step-by-step diagrams, scales, exercises, and 8 songs.

🎬 Subscribe to Violin Explained on YouTube for video demonstrations of violin scales.


Written by Sergei Panov, author of the Learn Violin Fast method book series and founder of ViolinExplained.com. Sergei has taught over 1,000 violin students and developed this method to help beginners learn as quickly and enjoyably as possible.

Posted on Leave a comment

How to Read Sheet Music for Violin: A Beginner’s Visual Guide

Reading sheet music is one of the most valuable skills you can learn as a violinist — it opens the door to playing any piece of music ever written.

The good news? It’s not as hard as it looks. In Learn Violin Fast — Book 1, I teach students to read music using simple visual connections between the staff and the violin. Most beginners can read basic violin sheet music in about 10 minutes using the method below.

Can You Learn to Read Violin Sheet Music Quickly?

Yes — by understanding that the staff is simply a visual graph where high notes are up and low notes are down, and by using memory tricks like FACE for spaces and “Every Good Burger Deserves Fries” for lines.

Let’s break it all down step by step.

What Is the Staff?

The staff is where all written music lives. Think of it as a musical graph.

  • The staff is made up of 5 lines and 4 spaces
  • Notes up high on the staff represent high-pitched sounds
  • Notes down low on the staff represent low-pitched sounds
  • Notes are always counted from the bottom up — just like climbing a ladder
  • If we run out of room, we add extra lines above or below called ledger linesImage of Page from Learn Violin Fast Book 1 showing and explaining the basics of music notation

Lines vs. Spaces: How to Tell the Difference

This is a simple but important concept:

  • If a line goes through the middle of the note — it’s on a line
  • If the note sits between two lines (one on bottom, one on top) — it’s in a space
  • It doesn’t matter if the note is filled in (solid) or empty (hollow) — the rule is the sameImage of showing notes on the staff with lines and spaces

What Is a Note?

Notes are written as a circle or oval shape. A note tells you two things:

  1. What pitch to play — determined by where it sits on the staff (high or low)
  2. How long to play it — determined by what the note looks like (filled, hollow, with stem, etc.)

We’ll cover pitch first, then rhythm.

Note Names on the Staff

There are only 7 note names in music: A, B, C, D, E, F, G. After G, we repeat back to A. These same 7 letters repeat over and over, getting higher each time.

Space Notes: FACE

The notes in the spaces of the treble clef staff spell FACE from bottom to top:

  • 1st space: F
  • 2nd space: A
  • 3rd space: C
  • 4th space: E

Easy — just remember FACE!

Line Notes: Every Good Burger Deserves Fries

The notes on the lines from bottom to top are E, G, B, D, F. Use one of these memory tricks:

  • Every Good Burger Deserves Fries
  • Every Good Boy Does Fine
  • Every Girl Buys Designer Fashion
  • Evil Gummy Bears Die FirstImage of musical notes on the staff, what are the notes on the spaces and lines.

The Stem Rule

Most notes on the staff have stems — vertical lines attached to the note head. Here’s the rule for which direction they point:

  • Notes below the 3rd line → stem points up (on the right side of the note)
  • Notes above the 3rd line → stem points down (on the left side of the note)
  • Notes on the 3rd line → stem can go either way

Important: The direction of the stem does not change the note. A D with a stem up is the same as a D with a stem down.Images showing stems on the notes can go up or down on the 3rd line

Connecting the Staff to the Violin

Here’s where it all clicks. In Learn Violin Fast, I teach students to visually connect the staff to the violin’s four strings:

  • The G string (lowest) = notes written low on the staff (below the staff, using ledger lines)
  • The D string = notes on the lower part of the staff
  • The A string = notes on the upper part of the staff
  • The E string (highest) = notes written high on the staff (above the staff, using ledger lines)

Think of it this way: the staff is a map of your violin. Low strings = low on the staff. High strings = high on the staff.Image connecting the notes on the staff to the violinImage connecting the notes on the staff to the violin

Understanding Rhythm: How Long to Play Each Note

Now that you know what note to play, you need to know how long to play it. This is rhythm.

Here’s a simple way to feel rhythm: walk at a medium-slow pace and stomp your feet at the same speed. That steady beat is your tempo.

The 4 Basic Note Types:

Note Type What It Looks Like How Long How to Practice
Whole note Hollow circle, no stem 4 beats Pluck a string, count to 4
Half note Hollow circle with stem 2 beats Pluck a string, count to 2
Quarter note Filled circle with stem 1 beat Pluck a string, count to 1
Eighth note Filled circle with stem + flag ½ beat Pluck twice as fast

Image showing note lengths and typesVisual Spacing Trick

One of the best ways to read rhythm correctly is to look at the spacing between notes:

  • Long notes (whole, half) have lots of space around them on the staff
  • Short notes (quarter, eighth) are squeezed closer together

The spacing isn’t always perfectly accurate, but it’s close enough to help you feel the rhythm visually.Image showing the spacing between notes can be visually seen between the distance between the notes

Key Terms:

  • Rhythm = how long or how many beats a note/sound lasts
  • Tempo = the speed of a piece or song
  • Andante = medium-slow tempo, like walking speed

The length of a note and the speed of the piece are not the same thing. A whole note is always 4 beats — but those beats can be fast or slow depending on the tempo.

Reading Your First Music on the Staff

Once you understand note names and rhythm, you’re ready to read real music! In Learn Violin Fast — Book 1, Part V walks you through reading and playing:

  • Open strings on the staff
  • G, D, and A scales — reading from notation
  • Hot Cross Buns on all four strings — from the staff
  • Twinkle Twinkle Little Star — full notation
  • Jingle Bells — full notation

Each piece builds on the last, so by the time you finish Part V, you’re reading and playing real music from sheet music.

Music violin notes of Twinkle Twinkle Little StarCommon Mistakes When Reading Sheet Music

Mistake Fix
Confusing lines and spaces If a line goes through the note’s middle = line. If it sits between = space
Forgetting note names Use FACE (spaces) and Every Good Burger Deserves Fries (lines)
Ignoring rhythm Count out loud! Say “1-2-3-4” for whole notes, “1-2” for half notes
Not connecting staff to violin Remember: low on staff = G string, high on staff = E string
Reading too fast Start slow — accuracy first, speed comes with practice

Practice Checklist

Use the Power of 10 — do each task 10 times to build muscle memory:

  • Name all the space notes (FACE) from bottom to top
  • Name all the line notes (EGBDF) from bottom to top
  • Point to random notes on a staff and name them
  • Identify whole, half, quarter, and eighth notes by sight
  • Read and pluck Hot Cross Buns from the staff notation
  • Read and play a D scale from the staff
  • Clap the rhythm of a simple piece before playing it

Get the Full Method

This guide covers the basics of reading sheet music, but Learn Violin Fast — Book 1 includes the complete visual system — staff diagrams, string-to-staff connection charts, the rhythm note chart, quizzes to test yourself, and 8 songs to read and play from notation.

👉 Get Learn Violin Fast — Book 1 on Amazon — the complete beginner method with step-by-step diagrams, exercises, and songs.

🎬 Subscribe to Violin Explained on YouTube for video demonstrations of reading sheet music and playing your first songs.


Written by Sergei Panov, author of the Learn Violin Fast method book series and founder of ViolinExplained.com. Sergei has taught over 1,000 violin students and developed this method to help beginners learn as quickly and enjoyably as possible.